Thursday, November 13, 2008

Cherry Flan

I was standing in front of super market freezer, having an emotional break down , finding out that there was no whipping creme on the shelf. Oh my, I stopped by 3 different places and they were running out of this thing? The only one carton was the French creme, President, which costs twice as much. Um...may be they didn't carry them anymore, I thought. But this is an expat market, they usually don't have a merry-go-round merchandises (if you've lived in china, you know how fast things discontinued on the shelf , especially imported stuff. For instance, one day you surprisingly/happily find a bar of new zealand butter in the freezer, you plan to by them sometimes, one week later, it's replaced by a pack of frozen dumpling, as easy as that) Maybe they found out that this is not a money-maker (?) I don't think so. Nestle creme (yeah, this is what I'm looking for, I didnt' mention it earlier) , the swiss name-locally made is somewhat popular. I just had hoped that there was nothing to do with Melamine scandal in dairy industry. Anyway, heading home sadly, I bought a pack of salmon instead, need to cure my disappointment with fish congee, my comfort food.

I need to bake something, something doesn't require whipping creme. Flipping through my recipes collection and stopped at a Blueberry Flan. I wrote a remark that this was very good. I baked it in 1996 when I was in collage. oh gosh, That was so, 12 years ago....my my my. I was such a rooker. The book was my second cook book that I illegally copied from a friend because I couldn't afford it. I treasure it as my mentor. I love this book and would recommend anyone to have it. It's called "The Best of Baking" by Annette Wolter, Christian Teubner, 1991. There are only used version by now. Unlike some of recent cook books, every recipes are so reliable and worth trying.

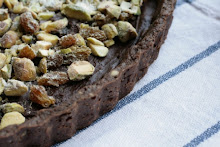
The pie shell, was the use of cooking crumb (from fine cooking magazine) left from my previous baking. It was SO...o..o...o good that everyone was asking me what I used as the pie base. It was crunchy, caramel-liked and has little nutty flavor. Here is the recipe.


Flan base (cookies crumbs - you can make this weeks ahead and keep them in airtight container)
This one is a little difficult to hanlde, I have to warn you. It tends to stick to the perchment/wax paper. Once done, put the tray off the oven and spray little water on the back of the baking sheet, it will be easier to peel off that way.
1/2 C of butter
1 C nuts of your choice , finely chopped.
1 egg
1tsp vanilla
1/2 tsp salt
1 C sugar
Turn on the oven 350 F
In medium heat, put the butter in the sauce pan. Brown it carefully, once you see it turns golden / light brownyish, immediately remove from heat , as it conitnues to cook even though removed from direct heat. Pour into an empty bowl, set aside for 5-7 minute. In a separate bowl, put egg, vanilla, salt, sugar and beat slightly with fork. Gradually pour in butter and stir until blend. Scoop a heap of teaspoon full on the well-greased wax paper, spare 2 -3 inch apart as these things spread a lot. Bake for 5-10 minute until gold brown. Once done, remove from tray and let it cool for a few minutes. Gently turn the Cookie sheet upside down , spray little water on the back side of the sheet, wait until it absorbs the moist before you start to peel the sheet from the cookies. Be careful not to over-spray, you dont' want your cookies to be soggy, do you?

Smash them in the bowl and put in the removeable base pan. You dont' need butter as the cookies crumbs are butter-rich. Be sure to have a foil wrapped under the pan as butter will leak during baking. put this in the fridge while prepare filling


Filling (Adapted from The Best of Baking , 1991)
3 cups of blueberries (I used maraschino cherries)
3 eggs, separated
3/4 cup (125g) granulated sugar
1 cup (125g) toasted ground almonds
powder sugar , for dusting
Dry cherries on paper towels. Set aside. Beat egg yolks and half of sugar until pale and creamy, mix in ground almonds. Beat egg white until stiff then beat in remaining sugar. Fold egg white into egg yolk misture. Stir in cherries.
Pour on flan tin and bake at 375 F (190C) and bake for 40 minutes. Cool 5 minutes in tin and transfer to the rack. When completely cool, sift power sugar over top or serve with whipped creme.
I chilled this over night so that the base was hardened a bit. Be sure to get your friend stong folks to dig as the base is a chewing-challenger. Enjoy!

Friday, October 31, 2008

Halloween.....n....n.. Creepy cupcakes

It’s been a while since my last post and I’ve been trying to shed my weekend baking something could possibly be a new hit. It was end of October and you all know it’s about tricks-or-treats. I'd been thinking what was a good bake on halloween week. I bought a box of deep-fried bamboo worms from ChiangMai in case I could use them in my goofy creepy Halloween treats. Having looked at those tiny poor things, gee…they looked so real (and they are real worms) that some people , including me, may have had goose bumps all over. I'd then better keep them for my afternoon creepy snack.

There are several haunting-cake ideas from websites; most of them require craftsmanship at certain level. Initially, I wanted to garnish my cupcakes with colorful gummy worms but couldn’t find any of those in super-mar-ka-ret. After a few thoughts , I relied on my convenient-loving habit, I came up with this one.

Before heading back home, I stopped by my landlady’s to pay the rent. She gave me a big box of Sugas (fruit cadies). Mmm…m…these little colorful gummies bring back memories. These are my favorites when I was young. (Please do not attempt to envision younger-me in black-white photos, I’m not that old). Anyway, poring them in a halloween's bowl and giving away to co-workers would be such a dull idea. Don’t you think? So, here we go.

Microwave candies under medium heat for a few seconds and have fun! My landlady got to be proud of me making the most out of her gift.


Muffin recipe is adapted from Elise’s Blueberry Muffin. Below is half batch of Elise’s, make 12 muffins. I copied her recipe / method here as it has detailed description. Thank you Elise!

Muffin
1 1/2 cups of all-purpose flour (replace 1/2 C of white flour with cocoa if you want to make chocolate muffin)
1/2 Tbsp baking powder
1/4 teaspoon baking soda
1/4 teaspoon salt
5 Tbsp unsalted butter (about ½ stick plus 1 table spoon or 4 oz), softened
1/2 cup sugar
1 large egg
3/4 cup plain yogurt
1/2 teaspoon grated lemon peel

1 Adjust the oven rack to the middle-lower part of the oven. Preheat oven to 375°F.
2 Whisk together the flour, baking powder, baking soda, and salt and set aside.
3 In a large mixing bowl, cream butter and sugar together, beating until fluffy. Add egg , beat until incorporated. Beat in the grated lemon peel.
4 Beat in one half of the dry ingredients until just incorporated. Beat in one third of the yogurt. Beat in half of the remaining dry ingredients. Beat in a second third of the yogurt. Beat in the remaining dry ingredients and then the remaining yogurt. Again be careful to beat until just incorporated. Do not over beat.
5 Use a standard 12-muffin muffin pan. Spray each muffin cup lightly with oil. Distribute the muffin dough equally among the cups. I equally filled each cup up to 50 g. They filled half way through.

Bake muffins about 25 to 30 minutes. I rotated muffin as it passed 15 minutes. Test with a toothpick to make sure the center of the muffins are done. They puffed up to the top of cup exactly what I wanted as I’ll put butter crème on. Those who want domes, you may try 75 g in each cup. Set on wire rack to cool down completely before garnished with peanut butter frosting.

Peanut Butter Frosting

1 cup Icing' sugar
1 cup creamy peanut butter
5 tablespoons unsalted butter at room temperature
3/4 teaspoon pure vanilla extract
1/4 teaspoon salt
1/3 cup yoghurt
Place everything in the bowl , mix with electric mixer fitted with a paddle attachment. Beat on medium-low speed until creamy until the mixture is light and smooth. Put butter crème in plastic bag, cut small tips. Then another fun part, no need to be neat. The goal is to make this frosting like creeping worms. Squeeze it on cold muffins.

Here comes the assembly. I really had fun doing this. I wanted to make sugary lizards, worms, bats and etc but too bad it required a bit of craftmanship.

Monday, September 22, 2008

In serch of the best Waffle-Sheryl's yeast waffle


After the first try, I was obsessesed with the idea of hunting down the best waffle. The second and third batch were yeast waffle recipes. Thank you Sheryl's for sharing. Begain waffle indeed superior in texture and taste. The recipe calls for overnight rest in the fridge but it sure gives you a full flavor. I was happy that the yeast gives the pleasant aroma rather than yeasty smell (imagine red wine?).

Prep time is short but you've got to plan ahead. I made two batches, one with egg added right to the batter at night, the other with egg white to be added right before cooking.


The following morning, after 7-hr rest in the fridge, the batter poofed up a bit, less than twice of last night's volumn. I could see some bubbles on surface.

Recipe adaped from Sheryl's website. I added up the sugar and cut down some butter.

Easier Belgian Waffle
2 cups flour
1-1/2 tsp instant yeast
1 stick melted butter (or less, I deducted 2 table spoon off of this)
2 cups warm milk (heated to about 110 degrees)
2 eggs
2 tsp vanilla extract
3 tbsp sugar
1/2 tsp salt

The night before: Combine and whisk together the dry ingredients in a large bowl: flour, yeast, sugar and salt. Combine the melted butter and milk. Add the mixture to the dry ingredients. Whisk eggs and vanilla together in a separate small bowl. Add the egg-vanilla mixture to the other mixture, and whisk until well-combined. Cover with plastic wrap and stick in the fridge until tomorrow morning.

The next morning: Prepare waffle iron. Stir the batter to deflate it (it should be puffy and frothy). The recipies mentioned that this batter will rise more than batters that use baking powder instead of yeast.

The below recipies is different that it added whipped eggwhite later (egg york added at night together with other wet ingredients). It makes sense to add 1/4 C more flour as I found out the batter is runny than the first batch.

1 tsp. instant yeast (Not to be confused with active dry yeast. Make sure it says "Instant")
2-1/4 cups flour
4 tbsp sugar
1/2 tsp salt
1 stick butter (8 tbsp) , melted, then cooled (or less, I deducted 2 table spoon off of this)
2 cups warm whole milk (about 110 degrees)
2 tsp. vanilla extract
2 eggs, separated

This is the batch with egg-white added last night. The dough consistency is thicker , see below photo. The other batch, I whipped egg white to soft peak, then fold into batter and it seemed the batter is a bit thinner. The problem with thin batter is that sometimes it doesn't rise up to the upper griddles and you would end up having scars on waffle surface. While , with thicker batter, the batter hold up its shape and jiggling while you pour it in. With more or sufficient amout of batter being added in the griddle, it rises and fills up to upper griddle and form nice and even brown crust. I didn't greasd , the recipe contains quite an amout of butter and it comes out from griddle easily.

After a few minutes, beside light indicator on waffle maker goes off, you can open up after all the steam disappears. Don't ever think about a sneak peak when it's not ready as half of uncooked batter will stick to the top and the other half to the botom. That way, of course , waffle structure is torn apart and won't be able to rebuilt after you turn the griddle back on. Here is the finish product. The left corner is a bit overcooked. I cannot reduce cooking time as this is to make up with the right lower corner being well-cooked.

I would say, Sheryl, you are right. Belgian waffle is the winner. Once you made this, you can never go back to baking powder waffle (if you don't mind resting batter overnighte). I recommend to put waffles in medium-heated oven, around 150 C just to keep them warm and crisp until you serve.
Amazingly, the waffle remains very soft and fork-tender after 1 hr sitting in my kitchen counter. Unlike american waffles made with baking soda that they are best eaten immediately as they turn chewy once cold, say after 15 min...and after 30 min, they become nice-looking bricks.

Wednesday, September 3, 2008

Waffle


Waffle is one of my goodies when I was a child. xxx years ago, while I was in grade 4, I always sneaked out after school to A&W outlet and had a piece of waffle with vanilla ice cream. Oh my...oh my....that was the happiest moment of my everyday life back then. I said "sneaked" because I studied in convent school and the nuns were so against students hanging round fast food outlets, let alone I was just 10 years old.

Up until now, far beyond the word 'child' or 'teen', I love waffle still. My first love after A&W's crush was dated back a few years in Hua Hin (Thailand), at JW Mariotte Hotel. The brunch there was really a decent one. The waffle was....SUPERB. It was soft and light, I could smell it from afar as it was made fresh from the griddles. With the hope of making this goodie at home, I asked hotel staff how these were made out of. And yes, the lady was kind enough to tell that egg/flour/butter/sugar were involved. Thanks! (with disappointing face) :-( Of course , I was desperated to get the recipe. No matter how much I praised her, she would not let a word out. The hotel staff were trained very well, I confirm.

The recipe I followed is of Alton brown, my kitchen hero. The batter was thicker than I thought but it came out fine. It was best eaten afresh once pulled out from griddles. And yes, I couldn't resist having a bite while I was photographing it. The one showed above was gone by the time I tucked my SLR camara back in the cover.


This recipe is not sweet. It goes well with maple syrup or honey or just butter. A scoop of vanilla ice cream on top would make your day. This is however cannot match with my second love at JW Mariotte's. (sorry alton).

Basic Waffle - By Alton Brown

4 3/4 ounces all-purpose flour, approximately 1 cup

4 3/4 ounces whole-wheat flour, approximately 1 cup

1/2 teaspoon baking soda

1 teaspoon baking powder

1 teaspoon salt

3 tablespoons sugar

3 whole eggs, beaten

2 ounces unsalted butter, melted

16 ounces buttermilk, room temperature Vegetable spray, for waffle iron

Preheat waffle iron according to manufacturer's directions. In a medium bowl whisk together dry ingredients. In another bowl beat together wet ones. Add the wets to the drys and stir until "just" combined. And this is important, just until it comes together. You can see some green-pea-size lumps but they'll disappear when cooked. Rest batter for 5 minutes.

Ladle the recommended amount of waffle batter onto the iron according to the manufacturer's recommendations. Some people always grase the griddles even though they are non-stick but I prefer not to. Also , be careful not to over pour. I made a mess on my counter top last time while the batter was bubbling out. Close iron top and cook until the waffle is golden on both sides. Serve immediately or keep warm in a 200 degree F oven until ready to serve.

Sunday, August 31, 2008

Carrot cake


Recently, I've been on veggie juice...It has been 2 weeks in a row that I started my day with celery, bell peppers, carrots, tomatos juice (let alone, ginger and bitter melon that I had on the first day and never wanted to have them again!). Leftovers from these veggy are huge bulk of fibre, good stuff. And I think I should bake something out of it.

I have a recipe from America's Tested Kitchen. The author explained how the ingredients were altered to obtain the best texture/best-taste carrot cake. While I was reading the experiment, I felt grateful there are some people out there trying /wasting egg-and-flour to perfect the recipe...to make it foolproof. The secrets lie within some tiny tiny details that I may not have figured out by myself. It is ... as I said, baking is the art and science.

Carrot cake is down-to-earth. Many people view this as a healthy indulgence compare to other kinds of muffins/cupcakes. It is made of vegettable oil (not butter) and contains carrots with loads of beta-carotine and B-vitamins .... it makes people feel a lot less guilty. It actually is 'okay' for those who are avioding saturated fat (butter) and/or transfat. It can be made using whole wheat flour, instead of white flour) with a touch of whole grains or nuts to make it more hearty. And this is good-eat !

The procedure is straight forward. However, mixing method is indeed the secret of preventing dense bottom. As with other recipe with fruits ingredients, carrot cake tends to be soggy as water content in carrot is difficult to control. Water diffuses with storage time since they are cropped. It varies with storage atmosphere and processing method i.e. grated, chopped, finely chopped.


The recipe called for chopped carrots processed in food processor as it's convenient to mix other ingredients in and that you won't dirty too many tools. For me, I dont' have processor so I use carrot left from juice extractor which was finely grated and a bit damp. I doubted if it could be soggy. If this turned into disaster, I could call it Nuntiya's tested kitchen. Or I could just spinned them all down in the bin (and cry for the day).

I don't know if ...by describing this too much in detail would expose myself to intellectual legal suit? anyone?

I was satisfied with the result...The cake is simple. However, make it to perfection is not easy. The analogy would be for a guy who is approaching next-door girl...it won't be a guarantee of success rate, so to speak.