Monday, November 21, 2011

Pumpkin Pie - The white, the brown and the in-between

Pumpkin pie, the only thing I don't quite like about making this is the prep. Envisioning the steaming and mashing the pumpkin makes me feel exhausted even before I start.  And I hate it this morning when I bought the wrong kind of pumpkin that costed me twice as much.

I then digged out my pressure cooker I bought from Shanghai. Although it looks as if was built before WWII, it served me right. Pumpkin was fork-tendered within 10 minutes!  Of course darling, you have to cut in pieces so it cooked faster. Dont' throw it in the pot whole as if the knife is non-existent.


Is this real? 

I usually make the pie crust well ahead of time. It stays fresh in your freezer forever if you handle them properly. I normally fully bake the tart shells, let cool completely and keep in air-tight container like Super Lock container. And put in the freezer. Believe me, it stays good for months. 

Sweet pie crust (blind baked)

180 g butter, cold, cubed
340 g  cake flour
-----
40 g ground almond
110 g icing sugar
a pinch of salt
-----
80 g of egges (1 large egg + 1 yolk)

In the mixer with paddle attached, beat butter and flour until resembles sand. Add ground almond, icing sugar and salt. Blend swiftly. Add 1 egg first, if it appears that the dough consistency is pliable (looks like play dough), do not add yolk. Blend quickly until just combine. At this point, if the butter starts melting, pat down the dough and wrap with plastic. Rest in the chiller for 10 minutes. 

Thinly flour working surface, roll out the dough into 2 mm thick.  Line into 10-cm individual tart rings, press and then cut the edge with scraper or with the dull side of your knife. Fork the bottom of the tart shell, rest in the freezer for 5 minutes or in the chiller for 10-15 minutes. Bake at 180 C for 10-12 minutes. Rotate the pan half way through if you spot the tarts are not evenly heated. Let cool. 

Filling  - makes 13 shells (below recipe yields 1,050 g of batter. Each 10-cm tart shell holds 80 g filling)

425 g of pumpkin, steamed, mashed with fork
3 eggs
70 g light brown sugar
80 g of granulated sugar
1 tsp of cinnamon
1/2 tsp of ginger
1/4 tsp of freshly ground nutmeg
1 tbsp of all purpose flour
1 tsp of vanilla extract
a pinch of salt
---------

120 g of unsweetened evaporated milk
240 g of half and half (or whipping cream)

In the food processor, blend together the first nine ingredients. Then pour in the liquid, or if your food processor is too small, transfer to a bowl and blend well. I incline to infuse the batter overnight for deeper flavor but was too keen to see how it comes out so I decided to bake it right away. The recipes that use brown sugar always make me nervous, I hate to see my goodies discolored. There are quite a few brown sugars in the market, wide variety of different colors, graininess and thus not very easy to judge which one would suit the recipe. I have not many choices though...after one of worst flood hits Bangkok, some of the grocery items suddenly disappear from the shelf....for good. 


I compare the result of using dark brown sugar compared with the white one (I didn't have the 'light brown' sugar on hands). Here, I made two batches of batter.


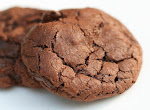
The darker batch seems nicer..... however when it was baked, the color became a lot darker , brownish, way too brown (see the square tart below) which doesn't look very appetizing. There are small cracks too which I have little or no idea of why it happened. The upper left tart is the one with white sugar, the surface looks pale, clean and nice. It puffed too. The upper right is the combination of both batches with dark amber color, which I like best. 


Baking - Bake @160 C for 25-30 minutes just until the rim firm up and the center is still wobble when you shake the tray. Always bake them in the tart pan or they'll break or perhaps leak. Keep in fridge until serve.

All of them tastes really good. The one made with white sugar has lighter taste (I tend to say , compare to their peers it was a bit boring.) while the one with dark brown sugar pronounced spices. Taste wise, I would put the red ribbon to the square tart. Too bad the look doesn't seem to be a winner. 

I do love the combination of crispy tart shell and custardy pumpkin. I am glad the tart shell doesn't get soggy the second day around although I put them in a loose plastic wrap in the fridge. Keep in mind as well, you have to keep these tarts in the fridge until just before serving. I put them out on kitchen counter with 27 C room temp, it starts to get soggy.

It tends to weep on the surface when left out on the counter which makes it looks more shiny and I don't mind though as I'll put whipping cream on top at serving. Cook-illustrated recommends to pre-cook the pumpkin puree to get rid of water but I found my homemade puree is too thick and cooking them up would only leave me a messy sticky  crust on my pan. But if you find the puree too runny, whether homemade or canned, a good practice is to evaporate some of the excess water. 

Spices - The original recipe calls for only 1/2 tsp of cinnamon. I double that up because I felt ginger overly striked my tastes palate....so need to balance that out by adding more cinnamon. I do recommend you always taste the batter before baking and adjust spice according to your liking. 

Family size pan - If you make the 10-inch deep dish tart, roll out the dough to 3mm thick so the proportion  between thicker custard and the tart shell are satisfyingly-balanced in a bite (I think). The baking times varies, depends upon thickness of the pan. I recommend 40 minutes and check every 5-10 minutes. 


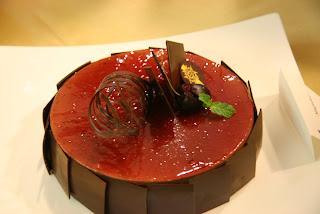
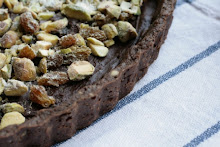
Here is how it looks after baking.
With thin maple syrup layer and ginger snap cookies


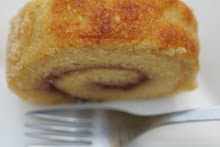
With whipping cream and a touch of cocoa.

Bon Appetit !

Friday, April 23, 2010

My choux doesn't shine....my past (random) failure


I have been successfully making choux a few times as of late. Then it struck me one day when my my batter just flopped in the oven. Well, they weren't really flopped, or deflated or anything. They just didn't rise at all.

The 10-cm fully-baked choux came out pretty much the same size as when they went into the oven, no puff, no air pocket for the filling or anything. Imagine bread sticks that waiters bring to your table when you visit Italian restaurant, that what they looked like. Despite disappointing result, they tasted great, tasty and buttery, a bit better than salty crackers. I was thinking whether they could perhaps become one of the most popular finger snacks ever made. However, the whole tray went directly to the trash.


There are a few things I want to share, not sure though if my theories are correct. I have been trying to google the instructions, to see if anyone talked about things that have been clogging my mind, none mentioned in details how the batter should be cooked in the pot , which I think IS the key to success. None even mentioned how batter consistency should be like before baking.

Here are un-confirmed theories of mine based on lecture in class and 7-8 repetitions at school and home.

- Choux batter needs to absorb as much as liquid as possible since it needs moist/steam to push up its structure in the oven (there are no other structure-builders such as yeast or baking powder here). This is achieved through gelatinization process where starch swells hot liquid while cooked in the pot. It starts at 60-65c and continues. The target temperature of the batter is around 80-85 C.

- The swelling process begins when you dump all the flour, all at once, into boiling water (this is done off heat) Why "all at once"? I presume adding flour little by little would quickly over-cook the flour into dumplings. Also, the all-at-once thingy brings down water's boiling point to target gelatinized temperature ? Perhaps?

- The purpose of precooking/drying dough in the pot until it dries out/or so called "forms a ball and leave thin film at the bottom" is to;

1) complete the gelatinazation process , to let the mass of clumped starch evenly heated. Also keep in mind that you need the dough to be as hot while stirring (optimum temp is 60-70 c, which is why most instructions advice medium heat***) . 2) to dry out the dough as much as possible so it can absorb liquid from eggs at its best capacity in later steps.

*** I have seen my classmate did the precooking at very high heat (we had exam, and she was in a hurry) I presumed she must have stirred it crazily quick, or the dough could have burnt. For me I used the medium heat and stir at my snails pace until the dough's consistency was similar to that of almond paste (or clay).

- Cool down the dough before adding eggs? eh...may be...but I find out... whisking the "beaten" eggs on to the hot batter vigorously is a practical way to mix. (so you don't have to cool down, just mix in , quickly. It's fast, it's okay to do. So, let's do it.

And here comes last part (but not least) before piping, it's when we add eggs. Yes, sounds simple but read this carefully, I believe this tip is the secret in making 1) well-puffed 2) well-shaped choux.

- When you add eggs half way through, notice whether the batter becomes too runny to pipe (see batter texture we want to achieve below). If it is, bad news, the dough is not sufficiently cooked/dried out in the pot, thus low-absorption ability. If this happens in class, chef would advice throwing this away and start over. If this happens at home, you may continue to add more eggs as called for and bake that runny batter anyway. It still puffs up nicely but keep in mind the batter is too runny, it won't hold any shapes as you wish it would. Alternately, you can fry Churros/Funnel cake using this batter.

- The goal we want to achieve - batter must be pipable, not too stiff/too dry to pipe that it rips off the piping bag, not too soft that it cannot hold the shape or flats out right away when piped on baking sheet. Below is a sample of the batter. To test, with the spatula, scoop up the batter, if it drops down and leave hanging V-shape , it's good to go. Or, when you drag finger to cut through the dough, it slowly pulls back on , covering the gaps.


Now, I found quite a few websites left out these critical parts of how the dough consistency should be like. Of course baking choux is easy, but making it nice and "consistent" is not as easy as it seems. Most amateur bakers don't cook the batter properly in the pot.


Even worse,  they continue adding eggs as the recipe calls for, no matter how runny the batter is and end up having flat choux (although they have satisfying big air pockets). Some instructions advice us to stop adding eggs whenever we achieve piping consistency/texture, regardless of (too) little eggs we've added. Result? too little eggs, not enough liquid, not enough steam in the oven thus no push-up for the choux. Final products are weird looking buttery bread sticks with no air pockets just like what I experienced.

- Oven temperature - If you have fan forced oven, 170-180c would be appropriate. For bakers oven , it's 190-200 c for the first half and 180 c for the rest. Baking time depends largely on the shape of the choux and how crowded you lay them on the tray. So you may check for the doneness 1) surface is evenly golden brown, no white streaks appear on the cracks 2) it springs back when gently push and 3) the bottom is evenly brown out. Be careful not to open the oven door too early, before they fully rise otherwise the steam will escape and they will collapse. Nothing can be done to fix that.

Do not crowd the tray, for some reason, it would take a lot longer to bake them through. And then, if you happen to open the oven before they puff, you know you would regret.

I won't mention the process after baking such as poking /cooling down and filling. There are some other tips which I haven't tried such as spraying water into the oven before baking to increase steam. I personally do not think it would help largely because the steam that help pushes the choux is trapped inside starch molecules. Well, if anyone can back this spraying tip with your experiment, please do let me know.

And here is a very informative website I found, with lots of beautiful illustrations. He mentioned a good trick to prevent cracks on surface. I haven't tried the mix of bread+pastry flour, which is interesting. If anyone tried, again, please let me know the result.

Hope your choux shines !

Sunday, March 14, 2010

Mogador - Who would have known it is de-li-cious

What is Mogador?....I didn't have a clue of what it meant. Perhaps it was the name of a city somewhere, I thought. I wiki'ed it found out it was an isolated city of Moroccan where the French Troop disembarked in 18th century. Nothing much related to the raspberry puree soaked cake I was about to make. (!?) If anyone knows, educate me please.

By the way, I doubt why the French named quite a few of their cakes after their cities? I know we have some city-named cake with description attached to the cake i.e. Boston creme pie or New York cheese cake or Mississippi mud pie but do you know how Paris-Brest or Mogador look like? Um....may be it was their tricks to keep our curiosity alive.

I searched the key word 'mogador cake' and finally saw chocolate mousse cake topped with jam. Not as fancy as I thought. Fine, I had to make this in class anyway.

In the demo class, Mogador was made with chocolate sponge. Good news, it's not quite an artery-blocking/buttery-buttery cake. There is no butter added in the sponge. The sponge itself is pretty dry but later will be soaked with tangy raspberry puree. Chef insisted repeatedly, more than 3-4 times in the demo that all of 130 ml of raspberry puree must go in to an 8 inch by 3/4 inch high round sponge cake. Wow...that was a lot. But you know what. She is right. All the good tangy-sweet juice m-u-s-t be there, or you won't get happy customers. Here is what I meant by soaking the sponge. Notice the color, the sponge was chocolaty before.


I live in the tropical. Raspberry is somehow a luxury kind of fruit (just like when I lived in Shanghai, my Durian-no-thanks is considered precious fruit of all times for Shanghainese durian lovers). The puree we used in class is of Boiron, of course, imported from France. Judging from fancy, nice, stylish packaging, I am sure it would cost me quite a bit to buy this finished product. After class, I swung by a wholesale grocer near by to check it out. I was wrong.
A pack of frozen raspberry costs me 1/3 less than Boiron. Imagine me making my puree at home i.e. boiling+ squishing frozen fruit, discard rough meat, then I would probably end up only 2/3 of what I bought. Which doesn't make much difference had I bought the fancy packaging puree, let alone the fussiness and kitchen cleaning at home. Well, don't bother, I buy Boiron then. Okay, soak them up ! zzzzchzzzz.


Oh, just in case if anyone is keen in making raspberry puree at home, here is what my chef suggested off the class.

Raspberry Puree (10% sugar)
120 g Frozen raspberry
15 g of sugar

Bring these two ingredients to a boil. Squish with mixer and strain into fine puree. Let cool completely before use.

Back to the cake. On top of the sponge, here comes dark chocolate mousse. Raspberry and chocolate are always paired up well together, believe me.

Here is the sad part. Sounds simple but stupid me I made lame mistake making split mousse in practical class. Yes, it split !!!. I saw meself hitting me head ('me head', sounds like cute reggae accent, doesn't it?) , didn't know what went wrong. Having lost my mind for 3 seconds, I wanted to scream but was conscious enough there after not to panick the class.

Chef Geraldine, the savior, walked around, saw my poor thing clumping up badly. She gave me a dry but encouraging smile and say 'you probably need to do that again so that we have good mousse in the cake." [I agreed]

You know what, almost all the ingredients in class (except eggs, milk, sugar and salt) are imported from France. Although this has been incorporated into my (reasonably high) tuition fee but I did feel guilty to waste the whole bowl of President creme and Cocoa Barry's 58% dark chocolate. Oh dang it, all the goodies.....I was then envisioning under-nutritioned children in the third world and that I was asking them to forgive me that I wasted this much of food.....unintentionally.

What went wrong: I did temper the ingredients by adding 1/3 of cold creme into warm chocolate but guess I didn't do it properly. Chef Geraldine guided that whipped creme was way to cold and it clumped up chocolate, especially when I put the whipped creme bowl over ice bath before the mixing procedure and that also made the bowl itself colder that it supposed to be. That's it. (!?) Well, I actually had a lame excuse to use ice bath...I fear that the creme would melt , that's why....silly me! :-P

I corrected the second batch by, of course, I threw away the ice-bath right away after I was done with whipping the creme. Then put 1/3 of whipped creme into (room-temp) chocolate bowl, fold fold fold until well blended. Then added the rest of creme into chocolate bowl. Happy ending. Thanks chef.

Quite an adrenaline rush when you see the rest of the class was proceeding to decoration while I was still struggling with the mousse. Who cares, I got good mousse and I learnt how tiny detail could have spoiled the whole thing....of course I was so glad I made silly mistake. (Although it was very tempting to learn from mistake again, I will opt to do it right first time around).

So I piped out smooth chocolate mousse in the ring before filling it up to the top and flatted out surface. Sure, I needed to do it quickly before this little monster set up into a chocolate bar. I wondered if the practical room was way to cold that day or it was just me that worked at snail's pace....chocolate mousse did set up pretty fast.

Apologies that I cannot publish recipe from the class here. Indeed, these are not fancy things. I suggest you get chocolate mousse recipe from my hero's page Alton Brown. It would yield pretty much same good result. But be sure to use good quality chocolate though.


Decoration is something new to me. I always use this word to describe my lousy decoration...i.e. because it was 'new' to me which is why the deco is tilted here and there and etc. Well, it's how I sooth myself. Somehow I thought this is just a matter of god's gift , a bless to some people. I noticed many in the class are really talented at masking , decorating the cake and yes we are all started at the same point, zero. I envy them. I rally do. For me, I am sure am not gifted (shoot!) , I believe I just need one word..... practicing. I'll push myself a bit on that.
And here is the finish product of Chef Geraldine in the demo class. It's classy, isn't it. See, now you know what I meant by 'it just the matter of practicing'.
Bon Appetit!

Thursday, March 4, 2010

What I love most - It's the croissant day!!!


Last week was what I'd been looking forward to, making croissants. Wow...wasn't that g-r-e-a-t to finally make this goodie. My past experience is dated back 10 years (or more perhaps?) that I tried to make croissant out of a 20-lined recipe. Well...it was a total flop considering hot/humid weather in Bangkok that made the butter ran out in every possible ways starting from rolling and proofing. Now that I know a how-to, all I can say is that it's all about the little tips and techniques. Those who want to get start, I suggest you get a recipe here and see useful discussion here

Some observations.


- If you cannot source fresh yeast, use instant dry yeast, just weight up 33% of what required for fresh yeast.

- Coldness is your very best friend. If you live in the tropical, prep this in air-conditioning room. Or if not, use margarine instead of dry butter. I myself don't compromise for margarine as the after taste is not so pleasant. so, margarine is a no-no for me.

- Proofing the dough is tricky. Comfy temperature for yeast to grow is around 25-30 C. I would say 27 C to be precise. Also, at 27 C, butter stays nice and cold and is trapped in croissant layers. If you don't' want a soggy croissant dough, 25-27C is safe zone as butter melts nastily at around 32C.

- Rolling it a little tight. Press down gently as you roll would be a big help in making handsome croissants. I found out stretching the the tail while rolling is not necessary. But may be you can try both ways to see the difference.

I brought these goodies home. My sister and my mom just loved them, they raved about it for days. The crust was crispy and the crumb was soft and chewy. They said these are even better than the ones bought at the Oriental Hotel (one of our favorite bakery shops) and requested me to make this at home. Hey..hey, my arms are still aching from the class. Spare me, please! :-D Actually, I'm flattered, and of course , the school and the my pastry instructor should get the full creditability for this. Salute to them all.

Here are some variation you can make with croissant dough, decorating with pastry creme and fruits (in syrup). Nice, aren't they?


Wednesday, February 17, 2010

At Le Cordon Bleu Dusit, Become a s-tu-dent again !!


It has been almost half a year that I haven't updated my blog. Inevitably, tons of things that get priorities than blogging . Moving back to Bangkok was a one of the excuses. And you can imagine running errands from places to places indeed take (long) time especially under extremely extremely and extremely jammed traffic. I need to tone down my schedule a bit after all I couldn't finish 4 tiny errands as in my typical days Shanghai.

And yes, I took Basic Pastry class at Le Cordon Bleu Dusit. Although I wanted to yell out in my blog about my typical days at school or how my life is like at the turning point (from a banker to a wannabe-baker) or that I had a bad madelines day and etc., I was too torn out after 6 hours in class.

I will continue this blog to share my baking experience. For the time being , I think it's time to study for the practical class tomorrow. Phew..w..w.