Thursday, December 18, 2008

Chez Panisse Almond Tart


I need to confess. I misspelled Chez Panisse, for a few times before I got it right.

David described the famous tart in his website. While reading, my mind was wandering, sitting at the patio, fork-digging the tart...then the fork bent (as David mentioned, this pie was removed from the menu as customers complained they had trouble eating it with fork), I then use my hand grabbed it up...put it my mouth...chew...w...w. Okay, wake up to reality. I was inspired, it was time to strap on the apron.


I agree with David, this one is a bit tricky (and sticky). I would really really and really love to make it again, but...(yes, there is a but) I will need to stand in front of the oven at all times. You'll see why.
Find the recipe here

The crust was easy to make. The dough I made was not as soft as David's. I prefer to make it dryer as easier to handle that way.

Once finished rubbing butter into flour, I added water by spraying water into the flour(instead of pour 1tbsp directly into the bowl as I found it is almost impossible to get all bits well-combined with 1 pour of tiny amount of water). While spraying, toss the bowl to dampen dry crumbs.


Talking about spraying, I counted how many times I sprayed into the bowl, how many strokes would turn crumbs into dough. It counted 75. -_- I intended to measure ….75 puffs was equal to how many tablespoon or water(?) . I know, I got my agenda. The day passed by, I forgot to do this. Then My sub-consciousness reminded me, in my dream that I needed to do this first thing in the morning. So next morning, I did. [Are you envisioning me, getting up in the morning, running in PJ , crazily puffing water into a tiny tablespoon? My neighbor might have seen me , which explains why they looked at me in a odd way.

[now go back to procedures.]

I stopped spraying when the crumbs held together when I squeezed them in my palm. I think I used more than 1 tbps of water as directed. I was surprised though that unbaked dough came out drier than expected. May be the humidity was low? See below, humidity in my kitchen was only 30'ish (in summer it was 70'ish, and FYI, in Bangkok it was 80'ish in a non-rainy day).


I poured the dough on the working space, as the rule of thumps in making pie, I didn't knead. I wrapped the dough and it went directly outside the window. No, I dint’ throw away, I just rest the dough in a cold place. Outside was colder than the fridge. I set alarm clock not to forget it there, an hour later, before I went shopping.

Can I confess one more thing? I used bread flour instead of all-purpose flour. I have a (lame) excuse; bread flour is a lot easier to buy (here in shanghai) and a lot cheaper. I did try to source cake flour produced locally. No luck. Bread flour should be okay, I thought. I barely kneaded it, plus there was very little liquid in the dough, I was just crossing my fingers that gluten wouldn’t develop. And I’m glad it came out okay.


After I came back from shopping (gee, it was cold out there. I couldn't feel if my ears were still attached to my face. Especially, after an old guy pointed at me...gossipped with his grandson at the mall, maybe my ears fell off the ground !?). I checked myself in mirror and I looked fine (and pretty). So, I strapped on an apron and started to roll the dough.


The dough was easy to handle. I pressed the dough up to fully cover the side. Once done, I chilled the pan for half an hour. Put it out, slid inside the oven and baked blind. After 15 min, the side of the dough shrank quite a bit !!! I kind of expected this but...oh gee, please don't shink further. I wanted to decored it up to the edge, made it nice...but boyd, the oven was hot! So, I just hoped that it left some edge for me enough to hold the filling.

While baking pie shell, I made filling, which is super easy. But hold on, once you pour the filling and start baking....someone got to do the dirty job.


In the oven, once the filling started to bubbled...I smoothed it out to prevent ugly top as described in David's website. It was not easy but it is a must. And when you open oven door frequently, temperature was , I think, a bit difficult to control.


And this was when I think how baking new recipe is interesting. There are a few factors out of control. Sometimes I just scream when things went wrong in the midst.


And , I found it very difficult to make top crust as nice the original. Eventhough this was a pain, I made this twice with in twon weeks. It was a big hit , maybe my (male) colleagues love something crunchy ? I myself like it very mooch (much) too. I will definitely make this again.


Thanks again David.

Note: David Lebovitz is my latest culinary hero, besides Alton Brown. :-D

Tuesday, December 16, 2008

Gingersnaps

Gingersnaps had me at hello. If I recall it right, I was on US domestic flight and they served crisp, flat, cookies. I didn’t even know what it was called back then until I flipped though the empty package....gingersnap(???). Apologies for my ignorance, I was not quite an epicure.

Recently, I bought ginger cookies from IKEA store, not bad at all. I understand that they are imported from Sweden as with the rest of the goodies on the shelf. My visits to IKEA lately didn't always end up buying housing stuff, but always carried back a few packs of cookies.

So far, I haven’t had bad gingersnap (and I wouldn’t wish to). I wonder if I could make one of my own. Since Christmas is around the corner, I have good excuse to strap on my apron.


Got Hardware? Ginger-man cookie cutter, checked. Rolling pin, checked. Hand mixer, checked. Got Software? Ground ginger, checked, Ground cinnamon, checked. Nutmeg, unchecked (uhh !).
See recipe from David's Website (Chez Panisse Gingersnap) here


I sprinkled cinnamon sugar on unbaked cookies. I have no quota on spices so…put them on!

The good thing about ginger cookies is that you can fearlessly play with it. It won’t go bad-shaped. One thing need to be care full is the room temperature that may soften the dough and that cutting and re-rolling becomes a messy task.

Verdict: I smiled when I had a bite. The sweetness is just right. If you roll thinly, it melts in your mouth. I will double ginger and cinnamon power next time. This is just the matter of personal preference. You may stick to recipe and adjust spiciness later on.
Comments from a freind of mine, Kate - "could you please next time don't make cookies resembles human shape ? I feel like a monster biting out those gingerman's litlle arms and legs."
Me - "okay, I'll make them round-shaped next time"
Kate - (silence, grabbed the last gingerman from zipbag) Ngawm..m..ngawm..m (chewing).
Me - 8-^

Monday, December 15, 2008

Miniature Cream Scones (Gourmet Magazine, March 1990)


Before I gave up, I had to finish this business, baking scones. The first time after two scones-disasters, I finally got nice, light, buttery, flaky scones. Thanks Epicurious for publishing this recipe (it was first published in Gourmet magazine , March 1990).

Ingredients

1/2 C of heavy cream plus additional for brushing the scones (I use egg+1tbsp of milk for brushing)

1 large egg
1 tsp vanilla extract
3 tbsp of sugar plus additional for sprinkling the scone
2 1/4 C of cake flour
1/2 tsp of salt
1 tbsp (or 3 tsp) of double acting baking powder
1/2 tsp of baking soda.
3/4 stick (6 tablespoons or 90 g) of cold unsalted butter, chopped into tiny bits.
1/2 C of dried currants (I used dark raisins)


In a bowl, whisk together 1/2 C of cream, egg , vanilla and 3 tablespoon of sugar until they combine well. I warmed up cream in microwave so that sugar dissolved easier. In another bowl sift all dry ingredients. I sifted twice so that wet ingredients can soak in quicker.


Now the key procedure, working with butter. I don't have food processor. And I cannot work with my bare hands as they are too warm to smash the butter directly into flour. The bottom line we want is coarse crumbs of flour+butter with the size of small tiny peas. My method is to chop up butter into little pieces, as if you are chopping onion for stir fry (some people use cheese grater, but butter must be freezing cold enough to grate) . No surprise, butter will stick to blade and chopping board, so sprinkle sifted flour, set aside in the bowl, would be a good idea. Once chopped, my butter cubes are just as small as 2 x 2 millimetres (oh yeah, they were that small). Feel free to sprinkle more flour while chopping as these will be all scooped back to the bowl. Once done , in the bowl, use pastry blade to cut in butter and flour mixture to coarse crumbs. This process should be quick as the butter cubes are very very tiny and they incorporate into the flour in shorter time. Be careful not to let butter metl, especially if your kitchen temperature is warmer than 25 C . Luckily, my kitchen was freezing cold, 12 C (imagine next week is Christmas !).


Warm up the oven to 200 C. Put the tray in the middle of the rack, no need to grease the tray.
With the fork, stir wet ingredients into the dry, slowly mix in. Don't over stir. How ? pause every 3-4 strokes and let the wets soak in. You'll see that once you pause, flour absorbs humidity around them and becomes lumbs. Continue stiromg, just until combine. Add raisins or other dried fruits of you choice. Some part of the dough will look a bit sandy or dry, that is okay.


On a lightly flour surface , knead the flour for 30 second , approximately 20 strokes, not more than that. I am a gluten nerd, I would do anything to prevent gluten formation as I don't think anyone likes chewy scones. (right ? right?)

Pat down the dough, roll into ½ inch thick. Make sure you roll it evenly; otherwise, the scone will be tilted when baked in the oven. Cut with cookie cutter, set aside. I used the 1.5 inch diameter cutter, yielded 9 scones.

On pre-heated tray, put scones next to each other, don’t leave spaces. Putting them shoulder-to shoulder will help them rise better (crowd them so they have no choice but to sit straight!) Some website suggests to thumb-press on top of scones to prevent domed structure. I didn’t do that, I forgot.

You can brush with cream as advises in the recipe. I brushed with egg, lightly beaten with 1 tbsp of milk. Be careful not to brush on the side as it prevents the edge to rise. Bake for 15-18 minutes or until brown.

Got Tea?

Monday, December 8, 2008

chocolate mousse

One day, I got bored and felt like I needed to make something nice out of my my left over creme in my fridge.

I love chocolate and so do my freinds. So , here it goes. Nothing fancy about it.


I was in search of gloossy chocolate frosting. (which obviously, this one is really not). But it does look pretty, doesn't it?

Friday, December 5, 2008

Chewy-after-one-week Brownie


I am not sure if I want to blog about this. Anyone who are big fan of Cooks Illustrated magazine must stop reading now. I mean it….NOW. Or please, navigate away from this page. Cooks Illustrated is an outstanding magazine. Well-described and detailed instruction turn easy-to-go-wrong recipes into fool-proof ones. But, for this brownie, they don't get my brownie points. I don't hate it but this is just not my favorite. I wonder what in the world would/could/should have gone wrong. Let me tell you how I did on the first try.

I have to admit, my fault, I decided not to follow the process as directed. I beat the eggs..yeah I did...(stop screaming , okay? okay?) I know that's a no-no for making chewy fudgy brownie, but...but I just wondered if this could turn into a disaster. And yes, I got what I asked for, a disaster. The brownie came out cake-liked. It didn't hold together, let alone fudgy'ness. It melted 3 seconds right after reaching my tongue (well, If you could manage to pick it up gently with your fingers and successfully deliver to your mouth). Taste wise, dull. (now imagine, cook illustrated fans are stoning me to death). As I mentioned, it was my fault, I'm the culprit, okay? I won't beat the egg when making brownie again. I promise. After the first bite, the whole tray went directly to my Ziploc bags and to the fridge. My heart was broken and I need to be alone for a while.

I opened my fridge a few days later, ziploc bags were still there. I was greeting hello to my brownie and as if they said something like "Don't worry, I'm cool...I'm cool". Yes, of course, they'd been sitting in the fridge for a few days, must be cool. I wondered how bad/staled it was so I dragged them out and had a bite. It turned out I had quite a few bites as It was pleasantly chewy. Yes! chewiness I was after. It really was good in later days. Wait a minute, was I cheking the mole around the edges? Just kidding, they were no mold.

Then....I wanted to share them with my friends. But given it was a few days old, plus the appearance was not well-maintained on the first day, I'd better chewed it up by myself. Okie, the taste is okay and the texture is right after a few days. I marked my calendar for the second try.

After licking my wound and my fingers, I was ready to re-visit the recipe. Everything was done as instructed. I promised to myself I wouldn't beat the eggs again...my hope was restored up high that I would get fudgy brownie of my dream. I didn’t use Ghirardelli as recommended but used >50% bittersweet chocolate bar I could source in supermarket.

The verdict ? Those who are Cook’s illustrated regulars who ignored my warning above, please navigate away from my page otherwise be ready for my harassment. Ready? Steady? Go!. The taste was exactly the same as last time, DULL. Texture was disappointing. I used to have a chewier brownie which was cooked in microwave (Dah!). This batch, I baked at night and left it sat outside the oven til next morning and the texture was still cake-liked. It was not dry or anything , it just too easy to fall apart. You know what, it was quite similar to the first batch that I intentionally whisked eggs until fluffy.

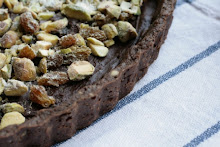
Here is my second bake looks like.


I belived the recipe did a good job in putting my hopes way up high. The crust was nice and shiny. But the texture , may be my expecation was parred up to the moon, was disappointing.

So, what make it so fragile, I doubt if I should use bread flour so that gluten develops the bonding (or the chewiness)? Well, thinking about that I have a few other recipes to try. It is a bad idea to be persistent. My conclusion, although Cook’s Illustrated claimed they threw away > 50 pans of brownie before coming up with this recipe, I would not bother my third pan of brownie and try this recipe again.

Every dark brownies has its bright side too. As I mentioned above briefly, the brownies are so good after day 3…repeat….after day 3. For chewing monster, keep them in your fridge for one week in Ziploc. No kidding, no mole, if your fridge is not overcrowded and works properly. The taste and texture develops with the passage of time. The other good thing about is that it has low fat content in relative to other fudgy brownies recipes. (well, may be this is why it’s not as fudgy?) You can feel guilt free having a little square for afternoon snack.


A debate on brownies could be endless. It is just the matter of personal preference. Mine? combination of shiny crust, cookies-liked+fudgy, cocoa+coffee taste, + some nuts. Yours? For more debates on brownie, visit NY Times article.

For those who doubt my comment. I would recommend you to try this recipe and compare it with other brownies you have ever had. Let me know you feedback.

(source: Cook's Illustrated2008)

5 ounces semisweet chocolate or bittersweet chocolate, chopped
2 ounces unsweetened chocolate, chopped
8 tablespoons unsalted butter, cut into quarters (1 stick)
3 tablespoons cocoa powder
3 large eggs
1 1/4 cups granulated sugar
2 teaspoons vanilla extract
1/2 teaspoon table salt
1 cup unbleached all-purpose flour

Turn on the oven to 350 degrees. I used 8 inch square pan but the recipe calls for 7 inch. I believe the thickness in 8 inch one came out just fine. Melt chocolate and butter with low-med heat in microwave, stir frequently. Or, heat them over simmering water. Stir in cocoa powder. Set aside to cool.

Whisk together eggs, sugar, vanilla and salt in medium bowl until combine, about 15 second (wow...that precise !!! this is what was described in the recipe, but I think it largely depends on your hand speed. For me, I normally do 20-25 strokes within 15 seconds while my grandma would have only 5 strokes. Agree?). okay okay I understand...the idea is to blend them well...not whisk for the fluffiness.

Whisk warm chocolate mixture to egg mixture then stir in the flour with wooden spoon until just combine. Pour mixture into the pan, level surface with spatula. Bake 30 or 40 minute, I recommend you to check after 25 if you use 8 inch pan like me as the batter spread out thinner. This recipe should be under-baked as it tends to comes out too dry because the low fat percentage. The doneness is observed by , the brownie is slightly puffed and tooth pick inserted in the center comes out with small bits of crumbs.

Cut the brownie after it's completely cooled down unless you need warm brownie with vanilla ice-creme.


My notes


- Don't bake in higher heat than 350 degree. I think a bit lower than 350 is fine so that you got the shiny sugar crust which develops with time. If it is baked under high heat, the batter will dry out before the sugar molecules float up to the surface and caramelize. And you end up with a dry and matted-surface brownie.

- I think putting a shot of espresso would be a way to go. I am not caffeine addicted, but am a coffee addicted. (confused !?)

- I would omit the cocoa powder. It does nothing to improve the flavor. Rather, I love the acidic taste in bittersweet chocolate.


And last but not least.....keep in the fridge for 2 days for chewiness. See, it's a good thing that this can be baked ahead ! Wrap in Ziploc or plastic box. If you fear of strange odors. You can place a tablespoon of espresso powder (instant or freshly ground are all fine) beside brownie. Even after 1 week when you put it out for afternoon snack, you got brownie's sweet smell, not the anchovy pasta you put in the fridge last night.

Dear Cook's illustrated magazine - when it comes to brownies, it's hard to please everyone.

Thursday, November 13, 2008

Cherry Flan

I was standing in front of super market freezer, having an emotional break down , finding out that there was no whipping creme on the shelf. Oh my, I stopped by 3 different places and they were running out of this thing? The only one carton was the French creme, President, which costs twice as much. Um...may be they didn't carry them anymore, I thought. But this is an expat market, they usually don't have a merry-go-round merchandises (if you've lived in china, you know how fast things discontinued on the shelf , especially imported stuff. For instance, one day you surprisingly/happily find a bar of new zealand butter in the freezer, you plan to by them sometimes, one week later, it's replaced by a pack of frozen dumpling, as easy as that) Maybe they found out that this is not a money-maker (?) I don't think so. Nestle creme (yeah, this is what I'm looking for, I didnt' mention it earlier) , the swiss name-locally made is somewhat popular. I just had hoped that there was nothing to do with Melamine scandal in dairy industry. Anyway, heading home sadly, I bought a pack of salmon instead, need to cure my disappointment with fish congee, my comfort food.

I need to bake something, something doesn't require whipping creme. Flipping through my recipes collection and stopped at a Blueberry Flan. I wrote a remark that this was very good. I baked it in 1996 when I was in collage. oh gosh, That was so, 12 years ago....my my my. I was such a rooker. The book was my second cook book that I illegally copied from a friend because I couldn't afford it. I treasure it as my mentor. I love this book and would recommend anyone to have it. It's called "The Best of Baking" by Annette Wolter, Christian Teubner, 1991. There are only used version by now. Unlike some of recent cook books, every recipes are so reliable and worth trying.

The pie shell, was the use of cooking crumb (from fine cooking magazine) left from my previous baking. It was SO...o..o...o good that everyone was asking me what I used as the pie base. It was crunchy, caramel-liked and has little nutty flavor. Here is the recipe.


Flan base (cookies crumbs - you can make this weeks ahead and keep them in airtight container)
This one is a little difficult to hanlde, I have to warn you. It tends to stick to the perchment/wax paper. Once done, put the tray off the oven and spray little water on the back of the baking sheet, it will be easier to peel off that way.
1/2 C of butter
1 C nuts of your choice , finely chopped.
1 egg
1tsp vanilla
1/2 tsp salt
1 C sugar
Turn on the oven 350 F
In medium heat, put the butter in the sauce pan. Brown it carefully, once you see it turns golden / light brownyish, immediately remove from heat , as it conitnues to cook even though removed from direct heat. Pour into an empty bowl, set aside for 5-7 minute. In a separate bowl, put egg, vanilla, salt, sugar and beat slightly with fork. Gradually pour in butter and stir until blend. Scoop a heap of teaspoon full on the well-greased wax paper, spare 2 -3 inch apart as these things spread a lot. Bake for 5-10 minute until gold brown. Once done, remove from tray and let it cool for a few minutes. Gently turn the Cookie sheet upside down , spray little water on the back side of the sheet, wait until it absorbs the moist before you start to peel the sheet from the cookies. Be careful not to over-spray, you dont' want your cookies to be soggy, do you?

Smash them in the bowl and put in the removeable base pan. You dont' need butter as the cookies crumbs are butter-rich. Be sure to have a foil wrapped under the pan as butter will leak during baking. put this in the fridge while prepare filling


Filling (Adapted from The Best of Baking , 1991)
3 cups of blueberries (I used maraschino cherries)
3 eggs, separated
3/4 cup (125g) granulated sugar
1 cup (125g) toasted ground almonds
powder sugar , for dusting
Dry cherries on paper towels. Set aside. Beat egg yolks and half of sugar until pale and creamy, mix in ground almonds. Beat egg white until stiff then beat in remaining sugar. Fold egg white into egg yolk misture. Stir in cherries.
Pour on flan tin and bake at 375 F (190C) and bake for 40 minutes. Cool 5 minutes in tin and transfer to the rack. When completely cool, sift power sugar over top or serve with whipped creme.
I chilled this over night so that the base was hardened a bit. Be sure to get your friend stong folks to dig as the base is a chewing-challenger. Enjoy!

Friday, October 31, 2008

Halloween.....n....n.. Creepy cupcakes

It’s been a while since my last post and I’ve been trying to shed my weekend baking something could possibly be a new hit. It was end of October and you all know it’s about tricks-or-treats. I'd been thinking what was a good bake on halloween week. I bought a box of deep-fried bamboo worms from ChiangMai in case I could use them in my goofy creepy Halloween treats. Having looked at those tiny poor things, gee…they looked so real (and they are real worms) that some people , including me, may have had goose bumps all over. I'd then better keep them for my afternoon creepy snack.

There are several haunting-cake ideas from websites; most of them require craftsmanship at certain level. Initially, I wanted to garnish my cupcakes with colorful gummy worms but couldn’t find any of those in super-mar-ka-ret. After a few thoughts , I relied on my convenient-loving habit, I came up with this one.

Before heading back home, I stopped by my landlady’s to pay the rent. She gave me a big box of Sugas (fruit cadies). Mmm…m…these little colorful gummies bring back memories. These are my favorites when I was young. (Please do not attempt to envision younger-me in black-white photos, I’m not that old). Anyway, poring them in a halloween's bowl and giving away to co-workers would be such a dull idea. Don’t you think? So, here we go.

Microwave candies under medium heat for a few seconds and have fun! My landlady got to be proud of me making the most out of her gift.


Muffin recipe is adapted from Elise’s Blueberry Muffin. Below is half batch of Elise’s, make 12 muffins. I copied her recipe / method here as it has detailed description. Thank you Elise!

Muffin
1 1/2 cups of all-purpose flour (replace 1/2 C of white flour with cocoa if you want to make chocolate muffin)
1/2 Tbsp baking powder
1/4 teaspoon baking soda
1/4 teaspoon salt
5 Tbsp unsalted butter (about ½ stick plus 1 table spoon or 4 oz), softened
1/2 cup sugar
1 large egg
3/4 cup plain yogurt
1/2 teaspoon grated lemon peel

1 Adjust the oven rack to the middle-lower part of the oven. Preheat oven to 375°F.
2 Whisk together the flour, baking powder, baking soda, and salt and set aside.
3 In a large mixing bowl, cream butter and sugar together, beating until fluffy. Add egg , beat until incorporated. Beat in the grated lemon peel.
4 Beat in one half of the dry ingredients until just incorporated. Beat in one third of the yogurt. Beat in half of the remaining dry ingredients. Beat in a second third of the yogurt. Beat in the remaining dry ingredients and then the remaining yogurt. Again be careful to beat until just incorporated. Do not over beat.
5 Use a standard 12-muffin muffin pan. Spray each muffin cup lightly with oil. Distribute the muffin dough equally among the cups. I equally filled each cup up to 50 g. They filled half way through.

Bake muffins about 25 to 30 minutes. I rotated muffin as it passed 15 minutes. Test with a toothpick to make sure the center of the muffins are done. They puffed up to the top of cup exactly what I wanted as I’ll put butter crème on. Those who want domes, you may try 75 g in each cup. Set on wire rack to cool down completely before garnished with peanut butter frosting.

Peanut Butter Frosting

1 cup Icing' sugar
1 cup creamy peanut butter
5 tablespoons unsalted butter at room temperature
3/4 teaspoon pure vanilla extract
1/4 teaspoon salt
1/3 cup yoghurt
Place everything in the bowl , mix with electric mixer fitted with a paddle attachment. Beat on medium-low speed until creamy until the mixture is light and smooth. Put butter crème in plastic bag, cut small tips. Then another fun part, no need to be neat. The goal is to make this frosting like creeping worms. Squeeze it on cold muffins.

Here comes the assembly. I really had fun doing this. I wanted to make sugary lizards, worms, bats and etc but too bad it required a bit of craftmanship.

Monday, September 22, 2008

In serch of the best Waffle-Sheryl's yeast waffle


After the first try, I was obsessesed with the idea of hunting down the best waffle. The second and third batch were yeast waffle recipes. Thank you Sheryl's for sharing. Begain waffle indeed superior in texture and taste. The recipe calls for overnight rest in the fridge but it sure gives you a full flavor. I was happy that the yeast gives the pleasant aroma rather than yeasty smell (imagine red wine?).

Prep time is short but you've got to plan ahead. I made two batches, one with egg added right to the batter at night, the other with egg white to be added right before cooking.


The following morning, after 7-hr rest in the fridge, the batter poofed up a bit, less than twice of last night's volumn. I could see some bubbles on surface.

Recipe adaped from Sheryl's website. I added up the sugar and cut down some butter.

Easier Belgian Waffle
2 cups flour
1-1/2 tsp instant yeast
1 stick melted butter (or less, I deducted 2 table spoon off of this)
2 cups warm milk (heated to about 110 degrees)
2 eggs
2 tsp vanilla extract
3 tbsp sugar
1/2 tsp salt

The night before: Combine and whisk together the dry ingredients in a large bowl: flour, yeast, sugar and salt. Combine the melted butter and milk. Add the mixture to the dry ingredients. Whisk eggs and vanilla together in a separate small bowl. Add the egg-vanilla mixture to the other mixture, and whisk until well-combined. Cover with plastic wrap and stick in the fridge until tomorrow morning.

The next morning: Prepare waffle iron. Stir the batter to deflate it (it should be puffy and frothy). The recipies mentioned that this batter will rise more than batters that use baking powder instead of yeast.

The below recipies is different that it added whipped eggwhite later (egg york added at night together with other wet ingredients). It makes sense to add 1/4 C more flour as I found out the batter is runny than the first batch.

1 tsp. instant yeast (Not to be confused with active dry yeast. Make sure it says "Instant")
2-1/4 cups flour
4 tbsp sugar
1/2 tsp salt
1 stick butter (8 tbsp) , melted, then cooled (or less, I deducted 2 table spoon off of this)
2 cups warm whole milk (about 110 degrees)
2 tsp. vanilla extract
2 eggs, separated

This is the batch with egg-white added last night. The dough consistency is thicker , see below photo. The other batch, I whipped egg white to soft peak, then fold into batter and it seemed the batter is a bit thinner. The problem with thin batter is that sometimes it doesn't rise up to the upper griddles and you would end up having scars on waffle surface. While , with thicker batter, the batter hold up its shape and jiggling while you pour it in. With more or sufficient amout of batter being added in the griddle, it rises and fills up to upper griddle and form nice and even brown crust. I didn't greasd , the recipe contains quite an amout of butter and it comes out from griddle easily.

After a few minutes, beside light indicator on waffle maker goes off, you can open up after all the steam disappears. Don't ever think about a sneak peak when it's not ready as half of uncooked batter will stick to the top and the other half to the botom. That way, of course , waffle structure is torn apart and won't be able to rebuilt after you turn the griddle back on. Here is the finish product. The left corner is a bit overcooked. I cannot reduce cooking time as this is to make up with the right lower corner being well-cooked.

I would say, Sheryl, you are right. Belgian waffle is the winner. Once you made this, you can never go back to baking powder waffle (if you don't mind resting batter overnighte). I recommend to put waffles in medium-heated oven, around 150 C just to keep them warm and crisp until you serve.
Amazingly, the waffle remains very soft and fork-tender after 1 hr sitting in my kitchen counter. Unlike american waffles made with baking soda that they are best eaten immediately as they turn chewy once cold, say after 15 min...and after 30 min, they become nice-looking bricks.

Wednesday, September 3, 2008

Waffle


Waffle is one of my goodies when I was a child. xxx years ago, while I was in grade 4, I always sneaked out after school to A&W outlet and had a piece of waffle with vanilla ice cream. Oh my...oh my....that was the happiest moment of my everyday life back then. I said "sneaked" because I studied in convent school and the nuns were so against students hanging round fast food outlets, let alone I was just 10 years old.

Up until now, far beyond the word 'child' or 'teen', I love waffle still. My first love after A&W's crush was dated back a few years in Hua Hin (Thailand), at JW Mariotte Hotel. The brunch there was really a decent one. The waffle was....SUPERB. It was soft and light, I could smell it from afar as it was made fresh from the griddles. With the hope of making this goodie at home, I asked hotel staff how these were made out of. And yes, the lady was kind enough to tell that egg/flour/butter/sugar were involved. Thanks! (with disappointing face) :-( Of course , I was desperated to get the recipe. No matter how much I praised her, she would not let a word out. The hotel staff were trained very well, I confirm.

The recipe I followed is of Alton brown, my kitchen hero. The batter was thicker than I thought but it came out fine. It was best eaten afresh once pulled out from griddles. And yes, I couldn't resist having a bite while I was photographing it. The one showed above was gone by the time I tucked my SLR camara back in the cover.


This recipe is not sweet. It goes well with maple syrup or honey or just butter. A scoop of vanilla ice cream on top would make your day. This is however cannot match with my second love at JW Mariotte's. (sorry alton).

Basic Waffle - By Alton Brown

4 3/4 ounces all-purpose flour, approximately 1 cup

4 3/4 ounces whole-wheat flour, approximately 1 cup

1/2 teaspoon baking soda

1 teaspoon baking powder

1 teaspoon salt

3 tablespoons sugar

3 whole eggs, beaten

2 ounces unsalted butter, melted

16 ounces buttermilk, room temperature Vegetable spray, for waffle iron

Preheat waffle iron according to manufacturer's directions. In a medium bowl whisk together dry ingredients. In another bowl beat together wet ones. Add the wets to the drys and stir until "just" combined. And this is important, just until it comes together. You can see some green-pea-size lumps but they'll disappear when cooked. Rest batter for 5 minutes.

Ladle the recommended amount of waffle batter onto the iron according to the manufacturer's recommendations. Some people always grase the griddles even though they are non-stick but I prefer not to. Also , be careful not to over pour. I made a mess on my counter top last time while the batter was bubbling out. Close iron top and cook until the waffle is golden on both sides. Serve immediately or keep warm in a 200 degree F oven until ready to serve.

Sunday, August 31, 2008

Carrot cake


Recently, I've been on veggie juice...It has been 2 weeks in a row that I started my day with celery, bell peppers, carrots, tomatos juice (let alone, ginger and bitter melon that I had on the first day and never wanted to have them again!). Leftovers from these veggy are huge bulk of fibre, good stuff. And I think I should bake something out of it.

I have a recipe from America's Tested Kitchen. The author explained how the ingredients were altered to obtain the best texture/best-taste carrot cake. While I was reading the experiment, I felt grateful there are some people out there trying /wasting egg-and-flour to perfect the recipe...to make it foolproof. The secrets lie within some tiny tiny details that I may not have figured out by myself. It is ... as I said, baking is the art and science.

Carrot cake is down-to-earth. Many people view this as a healthy indulgence compare to other kinds of muffins/cupcakes. It is made of vegettable oil (not butter) and contains carrots with loads of beta-carotine and B-vitamins .... it makes people feel a lot less guilty. It actually is 'okay' for those who are avioding saturated fat (butter) and/or transfat. It can be made using whole wheat flour, instead of white flour) with a touch of whole grains or nuts to make it more hearty. And this is good-eat !

The procedure is straight forward. However, mixing method is indeed the secret of preventing dense bottom. As with other recipe with fruits ingredients, carrot cake tends to be soggy as water content in carrot is difficult to control. Water diffuses with storage time since they are cropped. It varies with storage atmosphere and processing method i.e. grated, chopped, finely chopped.


The recipe called for chopped carrots processed in food processor as it's convenient to mix other ingredients in and that you won't dirty too many tools. For me, I dont' have processor so I use carrot left from juice extractor which was finely grated and a bit damp. I doubted if it could be soggy. If this turned into disaster, I could call it Nuntiya's tested kitchen. Or I could just spinned them all down in the bin (and cry for the day).

I don't know if ...by describing this too much in detail would expose myself to intellectual legal suit? anyone?

I was satisfied with the result...The cake is simple. However, make it to perfection is not easy. The analogy would be for a guy who is approaching next-door girl...it won't be a guarantee of success rate, so to speak.

Friday, July 25, 2008

Cocoa Fudge Cookies and Banana Oatmeal Cookies


Here are two no-fuss cookies from Nicole Weston's Baking bites I love how these are so easy to make... especially when I don't need to bother hand mixer to cream butter + sugar. Everything goes in the bowl, mix , scoop and then poof..f...f here come my babies.

My first baby, Cocoa Fudge Cookies, original recipe is from Cooking light magazine but my inspiration was from a handsome photo displayed on Nicole's website. Here is the recipe. Cocoa Fudge Cookies Recipe


I couldn't find dried tart cherry so I put in white chocolate bits from my last cookie batch. The dough, as seen above, came out just fine, not too gooey and was easy to shape. This recipe turns out to be a coffee mate, these two things compliment each other so well. If anyone has a coffee house, you can serve this cookie with espresso. I believe people would crave both (coffee + cookie) even more. However ,this maybe a little too sweet for those who are chocolate hard core'r like me. Next time I would use tard dried cherry as stated in recipe to cut sweetness.

The second no-fuss cookies, Banana Oatmeal Cookies. Oh I need to say, I don't know why lately I crave bananas. Am I transforming into a monkey or I'm becoming one , or I've become one??? Never before, that I like this fruit. Never mind, I bake this out of my love of cookies and bananas. :-> Again, inspiration is from Nicole's baking bites. Thanks Nicole for the recipe.

Here is recipe Banana Oatmeal Cookies


I baked these two black/white cookies, gave away to friends, spared half a dozen for myself in a ziplock bag. I was surprised how quick I could finish them in one day even though I thought they would last longer on the kitchen shelf. Obviously, I am a good planner but a bad implementor. Oh...my chewy babies don't you hide in that little zipbag!!! .

Saturday, July 12, 2008

Outrageous chocolate cookies


This was my second effort after the first failure last month. What happened last time? It was a shame that I altered ingredients, as I was short of "real" chocolate and replaced with cocoa powder then added some butter intuitively. Result? weird pieces of hard cooked/bland biscuit. Lesson learned? YES. Don't be frugal on ingredients or alter the recipes unless you are experimenting a new one.

Okay then I promised I would decipline to what said in the recipe, and yes with all my respect (and from the failure last time) I measured up as accurate as I could. Sometimes you just trust your eyes and ears thinking that you've been baking for awhile and that measuring seems to be less necessary. Believe me, baking is art and science , the latter of which implies that you must follow instructions as much as possible.

I put loads of chocolate in. I love this recipe. It's easy, no fuss. While baking, my kitchen smelled like the house of chocolate. I love the look of cookies, cracky and crisp. They actually are very soft. The chocolate chucks are half melted inside, make you crave for a cup of coffee.

The orignal recipe is from Martha Stewart's website

http://www.marthastewart.com/recipe/deliciously-outrageous-chocolate-cookies?autonomy_kw=chocolate%20cookies&rsc=header_2

Makes 2 dozen

8 ounces semisweet chocolate, roughly chopped
4 tablespoons unsalted butter
2/3 cup all-purpose flour, spooned and leveled
1/2 teaspoon baking powder
1/2 teaspoon salt
2 large eggs
3/4 cup packed light-brown sugar
1 teaspoon vanilla extract
1 package (12 ounces) semisweet chocolate chunks

Directions

Preheat oven to 350 degrees. Heat chopped chocolate and butter in a microwave-safe bowl in 20-second increments, stirring in between, until almost melted; do not overheat. In another bowl, whisk together flour, baking powder, and salt.
In a mixing bowl, beat eggs, brown sugar, and vanilla on high speed until light and fluffy. Reduce speed to low; beat in melted chocolate. Mix in flour mixture until just combined. Stir in chocolate chunks.
Drop heaping tablespoons of dough 2 to 3 inches apart onto baking sheets. Bake, rotating sheets halfway through, until cookies are shiny and crackly yet soft in centers, 12 to 15 minutes. Cool on sheets 10 minutes; with a thin metal spatula, transfer to racks to cool completely.

I love the photo from this site. They close up the inner texture.
http://www.bakeorbreak.com/2008/02/14/outrageous-chocolate-cookies/

Thursday, June 19, 2008

Bitter Chocolate Cheesecake


This is the third (or may be fourth) time I made cheesecake. The result is always heavenly decicious and I doubt it very much (I borrow this phrase from my freind, Kate, who always begins her conversation by sayting this) if I'm in love with it. Or I just dont' have a criteria to judge what is a good or a so-so cheesecake (just like when you fall in love with someone that you can always see good side of him/her). I reduced half of sugar from what recipe called for and doubled-up cocoa and espresso so that I would end up having super intense caffee-choco taste. And hey, I got what I'd hoped for.

Verdict: The texture is not as dense as new york cheese cake but firmer than the French one. I love it this way coz it's manageble and that you can sieve cocoa powder or anything on it withour worrying the moist would swallow it down.

The above photo is taken 4 days after I made it. Looks a little rough but it sure tastes even better in later days.

Here is recipe.

Ingredients (everything at room temperature)
700 g Cream chese (soften)
6 eggs
2 c yoghurt
80 g sugar
16 oz bitter sweet choc (melted)
2 shots of espresso
4 tablespoon of cocoa
1 tbsp flour

200 g Oreo or Chocolate biscuits
100 butter (soften)

Prepare the base, add togeter butter and oreo. Squees them to make a dough. Consistency check: if they stick together as a ball, it's ready to go in the tray. If not, add more butter.

Put wax paper on to 9inch base. Press biscuit firmly using back of spoon.

Befor you make filling, put 9x12 inch tray in the oven. Add hot water half way thru.

To make Filling

Sofen cream cheese. I used a big fork and whipped it down for 10 min. I toned up upper arms by the time it was soften. As I warned you, make sure it is warmed down at room temp so that you don't have to work hard stirring it. My kitchen temp is around 30 C. So, if yours are 10'ish, you'd better leave it in slightly warmed oven. Okay, then add sugar, muscle up you biceps once more, stir till well blend.

Then, add egg, one at a time, stir well in each addidtion. Now the texture is yogurt-liked, add yogurt. Stir til just blend. If you are thinking about using a whisk, forget it, coz it'll add excess air in the batter which is not good.

In a separte bowl, add melted chocolate, espresso and cocoal powder.

Pour coffee+chocolate into creamchees mixture, stir until well blended.

Now your baby is ready to go. Pour into 9-inch pan over oreo base. Put on the water-tray , bake for 60 minutes at 170-175 C. Dont' sneak peek, you've got to be decipline. :-0

Once done, let rest in the oven for anohter 60 min. Then, before you go shopping, put it in the fridge for a few hours before cut and serve.

Decoration: Make patterns with cocoa powder or Chocolate leaves. I love to use the real leaves but it was raining outside, so I used maple (plastic) template.

FYI - I left a few pieces in the fridge for a week. It didn't weep and tasted heavenly good. Belive it or not. That's why I call this one "my baby".

Friday, June 6, 2008

David lebovitz's Cookies

The cookies speak for themselves. Yummmmm.

Here is David's recipe.
http://www.davidlebovitz.com/archives/2006/11/nick_malgieris.html

Thursday, June 5, 2008

A revisit to Green Tea Red bean


This is a revisit to green tea cake…no specific reason. This time I planned to make it nicer than I did last time i.e. with fillings being tubed out of pastry bags, with pattern on top.

I love the sponge, its color and texture was just right. Although I didn’t measure up how much green tea I should add. I guess it just the matter of color so I played it by ears (actually by eyes). I don’t like artificial color with neon-light green kind of thing.

Whipping crème melted down a bit while I was taking photos. It’s summer and the kitchen was warm though not sweaty. Speaking of summer, I have to add a brownie point to winter that… cold weather makes my whipped crème form nicely on cake layer as it should be (despite the fact that I had to wear thick jacket while baking).

My friends reminded me of upcoming scuba diving and I wonder if I could fit in diving suit. Got to shed down on desserts then.

Friday, May 2, 2008

Muffin Muffin


It's longgggg holiday and I get stuck at home. I am amazeded how the weather changes swiftly from winter to spring. I want to go city-walk but better do that late afternoon. So my plan is to make something nice and quick out of loganberries I bought last nite from street vendor, 5 yuan for a small basket.

Muffin can be nicely paired up with a good cup of coffee. I wish I have an expresso machine to make a nice cup of my own. May be I stop by coffee house later.

Mmm... I have colorful muffin cup but decided to use perchment paper. It looks retro yet give the sense of homemade muffin.

Here is the recipe from Elise's website.

Mix these dry ingredients together

2 cups all purpose flour
1 Tbsp baking powder
1/2 teaspoon salt

Whisk these wet ingredients together

2 large eggs
1 cup sour cream ( I use yoghurt)
1 teaspoon milk
2/3 cup sugar
8 Tbsp warm melted butter (1 stick)
1 teaspoon vanilla


Set aside 11 oz of fresh blackberries

Once you put the dries with the wets, do not overwork or the batter forms gluten and you'll end up with rubbery/dense muffin. The batter should not be smooth though. Lightly flour berries and mix in the batter gently. Fill in 3/4 of muffin pan. On the middle rack, I bake at 180 for 30 min or until wooden tooth pick inserted in center comes out clean. I dont' think next time I need to grease the perchment paper as the batter is lubricated by a fair amout of butter.

Verdict: Moist, fluffy and butter-rich. This is a no fuzz recipe and a keeper.

Got to go for a hot cup of latte. bye!

Thursday, May 1, 2008

Mochi (modified)


This is a modified Japanese Mochi. The ingredients is nowhere near the original. I guess small bite-size that resembles mochi that make people call it this way.

You can consider this as a healthy snack, I do. I love to have a few bites and drain down with a cup of tea. If you want to make this, get prepare well ahead of time to soak the beans overnight though.

Here is recipe.

Mix together these dry ingredients
All purpose flour 250 g
Baking powder 3 g
Baking soda 2 g

Mix together these wet ingredients
Egg yolks 1
Melted butter 40 g
Water 100 g
Sweetened condensed milk 125 g


Mix the wets to the dries to form dough. It should be soft but not gooey. The texture should be similar to that of clay. Add little flour if needed. Rest for 15 minuntes.

Black-bean filling
Black beans 250 g (soaked over night)
Sugar 150 g
Melted butter 40 g
Baking soda ½ tsp
Vegetable oil 2 tbsp
A pinch of salt

Bring black beans and baking soda to a boil for 20 minutes. We will put these in the mixer and dry it out again in the pan. So you have to drain out excess water. I cannot tell exactly how much liquid each machine needs in order to mix it finely. Different makes handles dryness differently though. I drained out too much water and that my cheap mixer got stuck so I poured little water back in.

In the mixer/blender , add sugar, butter and oil. Mix until form fine paste. Return ingredient to the pan under low heat. Dry it out a bit. You can test it by scoop out a portion and spat down back to the pan. If it disappears of blend with the rest of the paste….dry it out a bit more. Remember don’t over dry coz when it’s completely cooled down, it forms harder, more manageable texture. Oh you know what, you can taste the paste if it’s just as sweet as you like. I stick with the recipe as I don’t like it too sweet. Once finished, let it cool down.

Now the fun part begins. Cut the dough in to a golf ball size. Use the thumbs and yr finger tips to spread it out in circular motion. Ensure the trim is thinner than center coz you will finally put the trim together to form the ball. Add fillings, ah-ah, not too much, I know you love fillings, everybody does !. But believe me you don’t want to end up in a mess where black bean paste splats around your hands. Try your best to wrap it up. You may use water to ensure the dough is firmly sealed.

Bake 170 C for 10-15 minutes until golden brown.

Sunday, April 13, 2008

Soft Pretzel


I wish Kim&Scott is here, in Shanghai. I miss them so much. No, they are neither my relatives nor my friends. They are co-owners of famous Kim & Scott’s® pretzel based in Chicago. Their stuffed soft pretzels are so amazingly delicious that I was addicted to when I was in a small town in Oklahoma (where finest food in town was Subway sandwich and Sonic drive-in). My favorites are apple cinnamon and ham cheese pretzel. They are huge in size and can be filling.

Recently, I’m so into bread making. This is one of my favorite recipe from allrecipe.com I adapt it to my own version with less flour and more sugar. The dough can be made as dinner roll or garlic stick as it tastes great itself. For garlic stick, you can just brush with butter and sprinkle with garlic powder before put them in the oven. The recipe can make up to 12-14 normal-sized pretzels. You can half the recipe, but believe me, you’ll regret that you should have made the full batch once you taste them.

Last time I made stuffed pretzel with apple and raisin. Just like what usually stuffed in apple pie. OMG, It was so good. I love this recipe so much. The bread is good even though you keep them in the fridge for 2 days. It’s best when heated in oven or in medium heat in microwave.

In the make of pretzel, I took some photos. Unbaked mini pretzels are cute. They are like babies lining up for (baking soda) bath. They look naked this way. Don’t you think? Don't worry, we'll dress them up with sugar and nuts. Yumm.

Dough

4 teaspoons active dry yeast
1 tablespoon white sugar
1 1/4 cups water (110 degrees F/45 degrees C)
4 cups all-purpose flour
1/2 cup white sugar
1 1/2 teaspoons salt
1 tablespoon vegetable oil

Baking soda Bath – mix these together
1/2 cup baking soda

4 cups hot water
Topping Adhesive
1 eggwhite + 1 tablespoon of water

Cinnamon Sugar topping – mix all of these together. Squeeze big chuck of butter and mix well with all other ingredients. Final product will be coarse crumb with some peanut-sized bits.

½ cup of finely chopped walnuts (or other nuts of your choice)
½ cup of all purposed flour
½ cup of sugar
4 table spoon of cold butter – cut into small cubes
1 table spoon of cinnamon
A pinch of salt
Preheat the oven to 425-450 F.


For the dough - Mix everything together. Make sure you don't put yin-and-yang next to each other, which is salt and yeast. Knead to form dough. If the mixture is dry, add one or two tablespoons of water. Knead the dough until smooth, about 15 minutes. I used electric hand mixer. Those who have a professional kneading machine like Kitchen Aid stand mixer may turn on medium speed for 10 min and check if the dough passes window pane test. That is you can stretch out the dough into paper-thin without tearing it off.

Place the dough in a grased bowl. Cover with plastic wrap. Let it rise in a warm place for 1 hr.
After the dough doubles in volume, punch it down. On working space cut out a piece, a tennis ball-sized. Squeeze into stick, and then start to roll to make a rope on table. The texture of the dough should be now like clay. I was tempted to sculp it to a small buffalo...oh no, I was shaping pretzel here.

Well, you can shape it differently, big or small ones. I opt to do mini pretzels as it easy to dip-and-dress in further steps.

for mini pretzels --> 0.5 cm. diameter, 1.5 feet in length .
for normal size, sold-in-mall pretzels--> 1 cm diameter, 3 feet in length.

Twist into a pretzel shape, put ugly side down. Rest the dough for 20 minutes. If you like dense pretzel, skip resting process.
Here is how to twist pretzel.
Now, prepare assemble line. You‘ll need large-enough containers that allows you to dip pretzels and make coatings. So it depends on how big you pretzels are. Line one plate/tray next to one another so that you don’t dirty kitchen space.

Baking soda bath
Eggwhites bath
Strusel topping

Dip each pretzel into the baking soda solution. Make sure they are well coated. Note that unbathed parts will not be browned and you don’t want that, do you?

Dip into egg white bath. This will act as adhesive and make streusel stick on pretzel skin.
Place in streusel tray; coat pretzel on both sides and press gently.

Place on a greased baking sheet. Sprinkle more with strusel or other nuts of your choice.
Bake in preheated oven for 10 minutes, until browned. You are allowed to take a bite just for tasting.
My tasting costed me 2 pretzel, before I was aware....opps.