Friday, September 25, 2009

Chocolate chip cookies


Oh my...my. It has been a big while since my last post. Not that I was travelling or busy with my work. I was busy baking, photographing and researching (of course, food-related). There are long long long list of items that I wanted to blog about. I wrote down on paper and post-its that I sticked around my kitchen walls. Okay, one by one. phew..w..w.


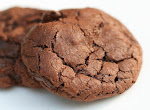
Chocolate chip cookies is a sinful snacks. Or you can consider it a meal if you have them from Levain. Here is my version with less fussiness. I just melt the butter in micorwave rather than cream it for 15 minutes as usual recipe calls for. I also opt to use bread flour, which tend to absorb more liquid than normal all-purpose flour. The reason i use bread flour is that , in shanghai, it is a lot easier to source bread flour (as you know, steamed buns are popular here.). Also, if you need the chewiness, bread flour would not hurt the texture. However, if you have all-purpose flour, you can simply use it , with same portion.


I like this recipe, especially with a touch of salt. It is just good that way. I normally reduce sugar to 90% (see recipe below). Storing: they are good 'outside' the fridge for a couple days. Best is to munch right away from the oven. So far I failed to keep them moist beyond day 3 even if I put them on Ziploc back. On day 4, they just turned into crisp and hard cookies no matter how they were stored, i.e. in Ziploc bag, in air-tight container, in the fridge or on kitchen counter. I found a tip on a web site that recommend putting a piece of fresh apple in the cookie jar. It claims this would help maintain the moist for a few days. But I wonder if those pieces of apple would turn rotten after 1 day (???). Would the cookies moist and molded? I don't know. If anyone try this, let me know.


This recipe makes 750 g of dough. So , if you make 30-g dough (for 3-inch diameter cookies), this batch yields 25 cookies.


No fuss Chewy Chocolate Chip Cookies -


2 C of bread flour (255 g or 9 oz) or alternatively, all purpose flour
1 tsp of baking soda
½ C of brown sugar
1 C of granulated sugar
1 tsp of table salt
1+1/2 sticks or ¾ C of butter (170 g or 6 oz)
1 egg + 1 egg yolk
2 tsp of vanilla extract
52% (dark) chocolate chuck, chopped.
Salt (sprinkle on unbaked cookies)

Sift dry ingredients together in a bowl, set aside. Make sure the brown does not clump up.

Micarowave butter in medium heat until completely melt (should not bubbling), mix in sugars. Stir with fork until they are completely incorporated and that you cannot see streaks of butter. Before mix in eggs, ensure butter mixture is not too hot. You can just simply poke a clean finger in the mixture and feel if it is too hot for your finger tip. If it is okay, pour in the eggs. Stir vigorously for half a minute until well-blended. Add vanilla extract, stir to combine


Add wet ingredients to the dries (or do it the other way around if you do not want to dirty too many bowl). Stir with fork until well blend. The good thing about making chewy cookies is that, it is a study animal, you don’t have to be kind. Just stir, smash, flip or do whatever to mix the dough.

Cover the cookie dough with plastic wrap. Push down the plastic so that it touches dough surface. And rest in the fridge until firm to make a ball, around 2 hours. For best color and taste, NYtimes recommend 24-36 hours rest in the fridges.
Talking aboug fridge, mine is not working well lately. I guess it is one of the very old models when anti-frost has not yet invented. So, whenever it was frosted, it stopped working. It just died. Then one day I found out my congee turned into “Gee” (as in "Gee! What is that smell!").

When you are ready to bake, pre-heat the oven to 325 F. If you want giant cookies, say 4-inch diameter, make 40-45 g of dough and then add dark chocolate chunks. I normally make 25-30 g dough, which yields 3-inch diameter, the right size to cure my crave.

Put the dough on the tray, lined with un-greased parchment paper, 2-inch apart. Flatten them down a bit. ***This is important*** Sprinkle salt very lightly on surface before you put the tray in the oven.


****this is also important (yes, notice 4 asterisks here!)**** bread flour differs in each location. Their ability to absorb liquid differs and this results in wet or dry dough that later reflect on the shape of cookies. The dough may not flatten at all. So, I suggest you try baking one cookies first and see if it flats out properly.If not, in the next batch, you can just flatten them down with your finger tips to the desired shape before baking.

Bake for 10-15 minutes for smaller cookies (25-30 g ball) , or 25 minute for giant cookies. Rotate the tray half way through to get them evenly browned.

They should be just a little dry out on the edge/surface but soft in the center. If you have thermometer, it should register 85C in the center. Do not over-bake or they will be just dry and hard. If the oven is too hot, the cookies will get burnt before they are done.


Remove from hot tray and cool on the rack.


Enjoy while they are warm. Got milk?


Monday, August 3, 2009

Sticky bun

After watching a clip on YouTube, Throw down with Bobby Flay- Sticky bun, I marked down my calendar on the upcoming weekend, "occupied all day". I needed to make this.

The recipe comes from a successful Flour Bakery-Boston. Joanne Chang, who runs the place and if you watched the clip, she won the challenge, of course. Since then, I started to google the famous Flour's sticky bun. People raved about it. The reviews/comments on Flour's pastries are something like this: to die for, extraordinary, worth all the time and effort, sticky buns on steroids, and much much more. The only complaint is about the place being too crowded that people described it as a madhouse, which, I find this rather be a compliment than a disappointment. No one can blame the place of its popularity. (!?)

Joanne uses Brioche dough. I had my first brioche years back. It was not impressive, a greasy type that left some kind of waxy feelings in my mouth. I doubt if this this recipe would throwdown my past brioche disappointment. Before I started , I read the recipe and I sighed. Butter butter butter, this was it. Brioche is born rich (of butter and egg) compare to other kinds of breads. Flour to butter ratio ranges between 50:100 and 100:100. Joanne's falls in the first category known as poor-man brioche. I am glad to start with the leaner version. The result was very satisfying and I do not think I would alter for richer dough. In other words, I do not want to spend my week end on the thread mill, if not necessary.


Brioche Dough:

2 1/2 cups bread flour
2 1/2 cups all-purpose flour
1-ounce cake yeast = 0.4 oz of active dry yeast, = 0.30 oz of instant dry yeast
1/3 cup plus 2 tablespoons sugar
1 tablespoon salt (or half the portion if table salt is used)
1/2 cup ice water
5 eggs
11 ounces butter, softened

Filling:
2 cups brown sugar
1 teaspoon ground cinnamon
1 cup pecans, toasted and chopped

Goo:
1/2 pound butter
15 ounces brown sugar
5 ounces honey
1/2 cup cream
1/2 cup water


First thing first. It's summer time. The weather is hot and humid. Kitchen temp is around 31 C and humidity is above 60% as it had been raining all week long. I was thinking that I might not need all the wet ingredients so I cut back half of the water in recipe.

Also, since I was skeptical of the result, I halved the recipe and used only 2 eggs (supposed to be 2.5 eggs as called for in the recipe) which weighed 95 g. So, in order to replace missing half egg, I added 25 g of water instead (well, egg white contains water, right), apologies for my love of convenience. I use the combination of bread and all-purpose flour as instructed. The cake yeast seems to be the problem for home baker like me. I used SAF instant yeast, reduced it to one-third of cake yeast which was around 0.15 oz. Be reminded that I halved the recipe. The tiny amount of yeast was almost beyond my scale capability to measure. I guess the scale accuracy is 0.05 oz so it blinked back and forth between 0.10 and 0.15.

As mentioned before, I cut back the water by half knowing that adding butter would make the dough soggy later on, especially in a warm/humid kitchen. The dough was really dry at first. But when added butter (it was half liquid-solid state and I think it was over melted. The instruction calls for soft stage), it became very wet and sticky.

I attached the hook to my stand mixer but finally changed to paddle. I continued to beat at medium speed for 15 minutes. The dough, or should I call it batter (?) was wet and it did not pass window pane test. And yes, even that I reduced the water by half the dough was wet. So I added 2 tablespoons of flour, beat further for 5 minutes. Well, ya I know....I was mumbling to myself that this was a disaster. I should have figured it out sooner that more flour was needed. Professional bakers who are reading this are so ready to whip me to death. zzchez...z..

The dough finally came off the bowl , which was a good sign. It almost passed the window pane test. I decided to stop the machine, feared that beating it further would mess up the leavening. The dough looked oily, soft and pliable. I rested the dough over night in the fridge. Note that the recipe requires to rest the dough for 5 hours.


Goo – Put butter and sugar in a non stick pan, medium heat. Reduce until very thick. Let warm. In a separate bowl, stir together honey, cream and water. Stir cream mixture into butter+sugar mixture, stir until well blended. Cover with plastic wrap and refrigerate for next day, it will become more solid after resting in the fridge.


Baking day – Turn on the oven to 350 F. spread goo on roasting pan, at least 2.5 inch tall, set aside. I have an 8" x8"x2” pan which was not tall enough. I later found out the goo boiled and overflew, a bit messy there .
On a flour surface, roll out the dough into approximately 1/4-inch thick. I would recommend 8"x8” rectangular perhaps? Combine the brown sugar, cinnamon, pecans and sprinkle evenly on the brioche. Or alternately, I sprinkled cinnamon generously until it covered up the dough then sprinkled brown sugar. I think I used around half cup. Keep in mind that the bun will be topped with Goo, so make it skimpy on sugar at this point, just enough to make nice brownish layer. Roll the dough up as tightly as possible as it will unwind during rest period. I wonder if it is possible to seal the edge? Some suggested to brush edges lightly with egg to seal. Well, I did not try that.

Warnings for those who work in warm kitchen. The dough tends to be sticky as you roll. So you'd better work quickly. I did so, tried my best to roll the dough into a nice rectangle but ended up rolling the dough unevenly into Oklahoma-state shape, approximately 8"x12", yielded 8 large rolls, 1 mid-size roll and 3 tiny rolls. Yes, I know I'm such a novice.

Each roll was around 1-1.5 inch thick. I placed 9 buns, evenly 1/2-inch spaced in the pan. For the 3 small rolls, I put them into individual muffin cups which are 1.5 time as large in volume. Cover with well-greased plastic wrap and allow rising until they expanded 1.5-2 times of original size. It took around 1.5 hr in my kitchen.

See, the bun hugged each other nicely in roasting pan. Zzch ! one photo shot for nicely proofed buns.

Place the pan in the oven and bake until light golden brown, about 30-40 minutes. I smelled the burnt caramel (as well as trouble) when the goo was sizzling and dripping out of my 2 inch tall pan. Oh no, I was hoping that my neighbor who are pensioners would not knock my door with walking stick and ask what was burning. If you have taller pan, do use it.

I rotated the pan at 25 minutes to get it cooked evenly. After 40 minutes, the top turned light golden brown. I took them off the oven, let cool for 20 minutes and then invert onto a large plates.

For the 3 tiny pieces that I placed in muffin cups. I baked with the rest of proper-sized buns. They turn out to be nicely shaped, wrapped up tightly in muffin cup. When inverted, the goo did not make them soggy. This was because I poured goo just enough to coat, around them. The ugly ducks finally turned out to be swans.!

The buns that I baked in 8'x8' pan, top bits were a bit soggy. The dough texture however was very impressive. I would say ‘extraordinary’ soft , light and fluffy. It is worth all the effort and the messy (goo) that I need to clean up . I took a bite and I thought it made my day. So I took the second one....(on and on). Before I munched them all up, I decided to put it down and finally finish some photo shoots.

Then, I was thinking about the last 2 tablespoon of flour that I added in later stage of kneading. Um...may be it was just small amount and didn't ruin the rest of the texture. Maybe?

The goo is just lovely, it gives milky aroma. I added a pinch of salt by the way. My Chinese colleagues said it’s totally too sweet. They had it cold the next morning i.e. took right out of the fridge, and told me the texture was good. It is so wrong that they had it cold, don't you think?

Some notes on the goo :
- It makes the bun soggy. Not sure what have gone wrong. Next time I will spread just enough to brown the bun. Think we can always put some more on top of finished product.
- It is too sweet for Asian taste, perhaps. But I think I am totally fine with it as is.
- I may experiment replacing butter with cream. But probably need to reduce further until it becomes very thick.

The sticky bun is addictive especially when it was warm. I could not put it down after the photo shoot. Best is to walk away. Well, there is nothing wrong with occasionally enjoying some indulgence as long as you don't go overboard. Moderation is what you need to repeatedly whisper to yourself.
To do after munching the second bun, sign up for half marathon in December. Yes! run baby run, baby run...n.

Saturday, July 18, 2009

Mini Tart - Fresh Blueberries


I have to say big thanks to Mr.Art who showed me the techniques and a step-by-step of how proper tart shells are made. The method he demonstrated was an original way using pastry blender. But those who has problem with cutting ice cold / hard butter into flour, food processor could be a really big help.

I did a little research on tart recipe with the same smearing technique. Some use whole eggs which I found out that the dough turn out to be too wet. Others use normal white sugar which does not provide neat final product as sugar does not dissolve and thus crystals appear on the tart shells.

Along my web-browsing, I came across a very nice and beautiful blog, Chocolate Shavings, who posted pretty photos of individual blueberry tarts. Thanks Chocolate Shavings for inspiration. I tried his pastries crème and it indeed is very mild and smooth. However, it did not set in the fridge and a bit too runny. So I did not use it finally.

Thanks Mr.Art again for tart shell recipes

Tart shells
400 g of all purpose flour
200 g of butter, cubed and chilled (or frozen)
60 g of icing sugar (Normal sugar is okay but you will see sugar bits in the final product)
2 egg yolks, lightly beaten
1/2 tsp of salt
1-2 tablespoon of very cold water (optional)

Be forewarned, this must be made in a cold cold and cold room. If your kitchen is warmer than 24 C, turn on the air-conditioner. If you don't have one installed, eh...I don't want to say this, but you can alter butter with other kinds of fat with higher melting point, like magarine. But of course, it doesn't taste as nice as butter.

Sift the flour, sugar and salt on in a chilled bowl, make a well. Put in the very cold butter. Incorporate butter into flour using pastry blades or pastry scraper until the dough clumps with the size of yellow splits peas, or even better, fine sand. You have to work quickly and ensure the butter does not melt. If it does, put the bowl in the freezer for 15 minutes and continue.

I prefer to use my tiny food processor that holds upto 2.5 cups of flour. It helps a lot especially if you are not ready to go physical with this task. I put 1/3 of flour mixture and 1/3 of butter and pulse for few seconds. Repeat for the rest.

Once the dough resembles small peas/sand, pour the flour on work surface, make a well in the center. Add eggs in the center; lightly fork around until dough comes together loosely. Then use both of your hand to form a pile of dough. If it seems to be too dry such that a portion of the ball falls apart, sprinkle 1 table spoon of very cold water, one at a time, until they come together. I would add probably up to, say, 2 tablespoons, not more than that. Or one might perfer, spray on the dough to distribute it evenly. But I wouldn't bother.
Smear the dough - From the top of the pile, use the heel of your hand, smear it out completely onto the counter surface. It should take a spoonful at a time. This process makes sure the butter is well incorporated into the flour and makes the dough easy to work with. Once done, put the dough together into ball, it should be smoother and more pliable. If you see butter chunks in the dough repeat the process. This can be done up to three times. For those who have warm hands, work quickly as we do not want butter to melt.

Form it into 2 balls and press down to form discs. Wrap with plastic wrap rest in the fridge for at least 1 hour.

Pastry crème
4 eggs
100g icing sugar
4 tbsp (40 g) all purpose flour
4 tbsp (32 g) corn flour
600 ml milk
a few drops of vanilla extract
a pinch of salt

Cream the eggs and sugar together until really thick and pale in color. Sift and beat in the flour and corn flour and a little cold milk to make a smooth paste. Heat the rest of the milk and salt in a sauce pan until almost boil and pour on egg mixture, whisk well all the time. Through sieve, return mixture to the sauce pan, discard the curd left on sieve. Stir over low heat until mixture starts to boil. If you are not quick enough, makes sure the heat is low or the curd will form up at the bottom/corner. I normally switch between whisk and spatula, to ensure I reach around the corner. Add vanilla extract to taste and cook further for a few minutes. The consistency should be a little thick just like that of pancake batter. Before putting off from heat, be sure to taste if the flour is cooked through. If it tastes a little grainy on your tongue, cook further and stir constantly for a few minutes.

Cover and allow to cool completely before filling in the tart shells.

Bake the tart shells

Take the dough from the fridge. If it appears to be too hard to roll out, leave it out for a few minutes. Or massage it on the board with rolling pin. I read on a Recipezaar that someone actually shaves pie dough on the tart pan and press it on. Quite an interesting technique but I have never tried that as yet. Roll out the dough on a lightly-floured parchment paper. Press the rolling pin on the dough, start from the center. The idea is to spread out from the center, then extend to the edges

Do not worry if edges are thick and ugly, we will get there later. For me, the dough was really difficult to roll when it was cold; I pressed the center down, just to ensure I did not have to squeeze it out in later rolling. Then turn the dough less than a quarter, repeat rolling from the center. Again do not bother if you don't yet reach the edge. If needed, lightly flour the work surface on the dough if the it seems to stick to parchment paper or to rolling pin. Once roll for about 4-5 turns, roll from center to the edge. Turn the dough while you roll. Repeat until it the dough is about 1/8 inch thick.

Consistency check – cut through the edge with pizza cutter and check if there are any spots thicker than others. If there are, roll to spread out dough evenly.

Use cookie cutter to cut to desire size that fits individual molds/tart pans. Place the dough on molds loosely. With unused dough tapped with flour, press the dough against the mold. Use knife, slash out unwanted dough on the edge. Prick bottom of the dough with a fork a couple times. Place a small parchment paper (a little bigger than the mold) in the center of the dough and weight down with beans. Bake blind for 10-12 minutes or until golden brown. When the shells are firm to touch, and turn golden pale yellow, remove parchment paper and beans. Continue baking around 2-3 minutes more to let inner shell dry out. Allow to cool completely before put in fillings.

Topping
Fresh blueberries
Jam of your choice.

Microwave jam in medium heat until just melt, press it through sieve. Letcool until warm to touch. Toss 1 tablespoon of jam with 1 cup of blueberry to coat. Set aside or wrap with plastic in the fridge.

Final assembly
Fill in 2/3 of tart shell with paster creme. Chill for a few hours. Do not place the blueberries right away or they may sink to the bottom. When ready to serve, put blueberry on top.

Ideas for decoration – garnish with little mint leaves or curls of orange zest on top.

enjoy !

Monday, May 25, 2009

Caramel Custard Cake


If custard cake to be displayed among other moussy creamy chocolaty cakes, it may not get our attention. Little had we known that one little fine jewel is sitting…. shining right there. The caramel cake, whether or not it glows out of display, it deserves our bites. As I recall, I never bought home this goodie. But once I tried, I was hooked. Believe me, it make you sing in the shower.

I lost the recipes a while back. So, this time I looked up custard recipe from the Internet, scaled down sugar and paired it with my favorite chiffon cake recipe. Here is how.

Caramelized sugar

½ C of sugar

Pour sugar in 9” cake pan set over medium-low heat. Sugar crystals should start to dissolve slowly. Keep close eyes on, as it tends to burn easily. Remove from heat, when it turns yellow. Tilt the pan back and forth to ensure it was browned evenly. The goal is to obtain dark mahogany color. I personally like it dark brown because it will be a bit paler when baked and melted later on. Stir with tooth pick occasionally if you see any spots darker than others. Remove from heat immediately if it starts to bubbling and turn light brown. Swirl the pan to level out caramel. Set aside.

Do: Pyrex glass pan is a good use, make sure the type you use is direct-heat resistant. The pan should be at least 2-inch high.

Don’t: use bottom-removable pan as the batter will leak in the oven. Non stick or Teflon is not a good idea, as dark color pan wont' allow you to see the color of caramel if it is ready or not.

Turn on the oven 330 F. Position the rack at the lower third. Put in a 12x12x1.5 inch tray half-filled with hot water.

Custard

2 cups unsweetened condense milk (or fresh milk)
1 tsp vanilla
2 yolks
2 eggs
1/3 cups of sugar
1/8 tsp of salt or a pinch

Beat yolks and eggs in the bowl, set aside. In a medium sauce pan , put milk sugar and salt over low heat, stir until sugar dissolves. Through sieve, pour milk ingredient over eggs mixture, whisk constantly for a few minutes. Stir in vanilla. Set aside.

Chiffon cake
(A) – sift together these ingredients.
1 cups (scoop out 1 tbsp) of all-purpose flour
½ tbsp baking powder
½ tsp salt

(B) –In a big bowl, beat yolks and sugar until pale and creamy. Most chiffon recipe allows you to beat flour, yolks, oil and milk together, I never tried that. It gives me peace of mind if I cream the yolk first so that I ensure that sugar crystal dissolves and the yolks are airy.

4 yolks
¼ cups of sugar

(C) – mix together the following liquid ingredient. Gently stir liquid in yolk ingredients, mix well. Set aside.
½ tsp vanilla
¼ cups of vegetable oil
½ cups of milk

(D) Beat egg whites until foamy. Gradually add sugar , 1 tbsp at a time, beat well each addition. Add crème of tartar. Whisk well unit it reaches soft peaks. Oh again, I forgot to take photo of my soft peaked whities..! And while you are whisking the whites you will hear cracking noise from the pan as caramel hardens.

4 egg whites
¼ cups of sugar
¼ tsp of lemon juice or vinegar (I used 1/8 tsp crème of tartar)

Add flour into egg-milk mixture into 4-5 batches, alternate with whipped whites. I used whisked to 'cut-thru' the flour first, ensure all the lumps break up and well-mixed into runny liquid ingredients. When the batter gets thicker (thick enough to fold), switched to spatula and added 1/3 whites. “Fold in” remaining flour and whites gently while rotating the bowl. It’s a good idea to fold from bottom to make sure no lump ingredients left unmixed. Set aside.

Through sieve, pour custard ingredients on hardened caramel. Then, pour batter over custard gently and evenly. Don’t worry if it seems to sink into milk mixture. It will spring back up in the oven. Now the 9" cake pan is filled with all the liquid and batter. Be very careful when place it on tray with half water. The water in tray should be hot and steamy.

Bake for 45-60 minute. This cake is better slightly over-baked than under-baked. Be warned, if custard layer is not fully cooked …… everything goes to the bin.

Check point: at 45 minutes, jiggle the top of cake with you hand. if it seems to be wobbly inside, continue to bake for 10 minutes. Cover the top with foil or baking paper if it is browning on the top. Repeat the test after ten minutes.

Once done, remove from oven and wait until it completely cools. Do not flip when it is hot as custard needs to be set in its container.

Tips: Once remove from oven, don’t cut across the edge otherwise melted caramel will leak to the side which will discolor custard and over-soak chiffon layer.


I rest the pan in the fridge for 2-3 hours until it completely set before I invert to serve. Before invert, dip the pan in a bowl of very hot water for 30 seconds. If you notice the cake does not shrink from the side, run the knife around to loosen it from the pan. Keep in mind you just want to free up the cake, don't run it all the way through custard layer or it won' t have a nice clean cut.

Left over melted caramel that dripping off is good as sauce, dont' wasted it. This cake is best eaten cold.

Tuesday, May 12, 2009

Variation of Flourless Chocolate Cake


This is one of variations you can play around with Flourless Chocolate Cake. The cake actually looks handsome when naked, without topping, with cracky crusty look. However, this would give more creamy texture. And , if you happen to misshape the cake during the process, cover it up with whipped creme would be a quick fix.

See how gooey it is inside?


The one is my all time favorite, you can find cake recipe over here. For the whipping cream, you can use Cool Whip or the following.

1 teaspoon gelatin bloomed in 2 tbsp cold whipping creme for 10 minutes
2 cups of whipping creme
1 tbsp icing sugar
1/2 tsp vanilla extract


Once gelatin is bloomed, melt over low heat, until completely dissolved, don't bring to a boil. Let cool at room temperature. Set aside.

Pour cream into the chilled bowl and whip it vigorously until it just begins to hold its shape. Add about 1/2 teaspoon vanilla extract and 1 tablespoon icing sugar, and continue to whip until it holds very soft, peaks. Drizzle cooled gelatin all at once to cream during whipping. Stop whipping when it forms soft peaks. Use immediately.

Friday, May 8, 2009

Butter cookies-sables à la poche-sand in your pocket

I always call them butter cookies. Apologies for the love of convenience. I recall a few years back I received a big bag of these for New Year gift. It was so rich and was really really and really hard-to-put-down. The whole family loved it and we finished a 2-pound bag in only a few days. I used to have the recipe with egg yolks but again…. I lost it. The problem back then when making this cookies was that the dough tended to melt very fast while piping. The hot/humid weather in Bangkok was to blame. I found a recipe using egg white and strong bread flour that caught my interest. I doubted how bread flour would help with piping. Here is what Apple Pie Patis Pate quoted in this web site “…..The sandy texture reminiscent of shortbread is achieved through the use of small amounts of liquid and sugar to minimize gluten development. The spread is also limited through the use of strong bread flour, allowing the piped cookies to hold the star tip pattern during baking….”. Genius huh !!! The recipe below is from Apple Pie Patis Pate who adapted it from Michel Suas’ Advanced Bread and Pastry. What I did differently was adding a few drops of vanilla extract and decorated with chopped dried cranberries. For the wet ingredients:

12 ounces / 340 grams butter, at room temperature
4 + 1/2 ounces / 128 grams powdered sugar
1 +3/4 ounces / 50 grams egg whites
a few drops of vanilla extract
For the dry ingredients:
1 teaspoon ground cinnamon (I omitted this)
13+ 3/8 ounces / 380 grams bread flour
2/3 teaspoon baking powder
1 teaspoon salt
For decoration
Dry cranberries , chopped
Sift the dry ingredients together and set aside. Cream the butter until pale and cramy then mix in the powdered sugar. Add the egg whites and vanilla extract slowly and mix until thoroughly incorporated.
Add the sifted dry ingredients to the wet ingredients. Mix just until thoroughly incorporated, take care not to over-mix. Use a pastry bag with a large star tip, pipe into 1 1/2 inch wide mounds.
I decorated each cookies with dried cranberries.
  
Bake the piped cookies at 325ºF for 15 minutes, or until lightly golden and well-browned on the edges.

Sunday, April 19, 2009

Orange cake


I was obsessed with chocolate cake for while. Now it is time for light and fruity dessert. This one is really refreshing. It is also guilt-free as low in fat content.


Sponge cake (I use 7-inch oval-shaped non stick pan)

50 g of cake flour
a pinch of salt
2 eggs
50 g of sugar
3 g of melted butter, warmed at room temperature (you can omit this, but for me it really makes difference)

Sift flour and salt, set aside.

Beat eggs and sugar until creamy/foamy and pale. Add butter, I don't directly pour melted butter as it will end up sinking to the bottom of the bowl. I scooped out 2 tablespoon of batter and whisk in butter, incorporate them well.
Then pour it back into egg mixture, fold in gently about 3-4 times, Don't over work. Sift in flour, in 3 portions, fold from the bottom to the top by moving spatua along the side of bowl. I do this from left side and alternate with the right. Rotate the bowl as you go. Some may suggest to use spatula cut in the middle of bowl and scoop up along the sides which is one of many's most favorite folding method. I found out that it tends to deflate the volume. You may try out a few times which technique suits you most.
Continue on....the batter will deflate a little, don't panic. Continue to fold from edge of bowl, while rotating. Make sure no lumps of flour left. Again, do not over work. Making basic sponge is not as simple as it appears. Believe me, this is just the matter of practice. After countless of disasters in the past i.e. lumps of flour all over the cake, I finally did it right.


Bake at 175 C for 15 min or until toothpick inserted in the center comes out clean.


Wait until it completely cool. The cake will shrink from the side. Cool on the rack. Cut by half and apply jam of your choice. I used raspberry jam.


Orange glaze

150 g of water
50 g of concentrated orange juice (I used sunquick)
12 g of cornstarch
1 tbsp of sugar
a pinch of salt
10 g of butter

On low heat, put everything in a pot except butter. Stir constantly for 5-8 minutes. When the mixture is heated up, you need to stir more quickly to prevent the curd at the bottom, or remove the pot away from heat. I finished mine in 15 minute, on very low heat. The consistency should be thick, honey-liked. Stir in butter and stir well. Pour on the cake immediately as it will set at room temperature.

If the glaze is thick, you can set over very low heat and stir until it reaches pouring consistency. I actually waited until it was very thick and pour on cake in one go, with one direction. If you pour back and forth, it may leave ribbon trail or bumpy look which is not desirable.


I sliced in pieces, using serrated knife and here it is. For clean cut, clean the knife after each cut with clean towel.


Sunday, April 12, 2009

Nectarine Strusel Upside Down Cake

What would you do if you cannot sleep at night? watching TV? reading?

Last week, I read a cook book at 10 pm. And as usual, instead of putting me back to sleeping mode, it woke me up. I wanted to strap on apron right after I read through the paragraph how streusel was baked. My CPU inside my head started to revolve at 65536 rounds per second. I bet, if there is 24-7 supermarket opened, I would have run out to buy 4 nectarines and eggs which I used up a few days ago.

The cake, baked with 10-inch pan, is big enough to serve 10 people i.e. one piece for each. But if your guests are sweet-toothers, you may need to sacrifice your portion. The cake is meant to be basin-liked, slope towards the center, which is how nectarines were arranged. The surface was pretty with the nactarin pattern, browned by butter and sugar. It was nice...just nice. I know if this is put for sale it may not look very attractive, but as I made this out of scratch, some how I managed to see it as a a rustic beauty.

The recipe also allows apples or bananas if nectarines are not available in your area or if they are not in the season. I love nectarines though. Their sourness goes really well with the cake. The streusels in the center are chewy and crumble. My only complain to this is that I prefer thicker cake batter layers.


I suggest you to bake streusel first as it needs to be cooled down completely before use.

Below is streusel recipe. I actually “doubled” these up as you can see thick streusel in my photos. You may stick to the original portion and see if you like it.

1/4 cup of almonds, chopped
1/3 cup of all-purpose flour
1/4 cup of (packed) dark brown sugar
1 tsp of cinnamon1 tsp of ginger
1/2 stick (2 oz) of unsalted butter , cut into small pieces
1/2 cups of rolled oats (not instant)


Turn oven to 350 F. Toast chopped almond until golden brown. Mix flour and cubed butter with forks until resembles crumbs. Add brown sugar, nuts , cinnamon and ginger, toss a few times to mix in. Spread unbaked streusel onto the largest tray so that it won’t pile up and is cooked through easily.

Bake the streusel for 10-15 min 350 F stirring into piece after it slightly cool down


Topping:

1/2 stick (2 oz) unsalted butter, melted
1 cup (packed) dark brown sugar
3-4 ripe medium nectarines , each cut into 8 pieces

Center a rack in the oven and preheat the oven to 350 F.


Pour melted butter over bottom of 10-inch pan wrapped with foil at the bottom (to prevent leaks). Sprinkle brown sugar evenly and arrange nectarines as shown in the photo. You can arrange clockwise and the other row as counter clockwise. Set this aside and prepare the cake.

The sponge:
1 cup of all-purpose flour
1 tsp of baking powder
1 tsp of baking soda
1/4 tsp of salt (or 1/8 tsp of table salt, don't even think about omitting this tiny portion)
4 egg yolks
6 egg-whites
1 1/2 cup of sugar
1/2 cup vegetable oil
1/2 cup of fresh lemon juice

Sift flour, baking powder and baking soda together

Beat half of sugar, salt and yolks until pale and creamy, then whisk in vegetable oil and lemon juice (I actually replaced with concentrated orange juice and cut down sugar by ¼ cup). Do it gently but quickly until no oil streaks left. Don’t worry if the batter deflates. The recipe actually instruct to mix in 1 cup of flour into the yolk mixture but I think that would dense the batter so I fold in only 1/3 cup of flour then I turned to beat egg whites.

Beat egg white until fluffy, add a 2-3 table spoons of sugar, and continue beating. Gradually add sugar as you whisk. The whites should form light-foamy stiff/ shiny peak when it is ready to use. I whisked by hand and it took around 8 minutes.

Add 1/3 of egg white mixture into yolk mixtures; fold from the bottom of the blow with spatula quickly but gently. Do this in different directions such that you flip the batter up from left and next you fold and flip it up from the right. After adding the whites, batter will be runnier and ready for more flour. Fold in 1/3 cup of flour. Alternate between flour and egg whites in 3 batches until both ingredients are used up. Ensure there are no lumps left.

Pour half of batter onto arranged nectarine. Use spatula to spread out to cover fruit base. Sprinkle streusel evenly to make layers. Pour the rest of batter on top of streusel. Use spatula to spread evenly. I was tempted to cover up all the fruit so I mistakenly over poured the first batch and I almost had too little on the top to cover streusel. Don’t make the same mistake as I did.

Bake at 350 F, for 45-50 minutes or until golden brown and a toothpick inserted in the center comes out clean. My cake browned quickly during the first 15 minutes (I wondered !!!), so I covered with waxed paper. It didn't help much and was and burning. Oh my gosh, I was devastated. I put a disc from removable pie pan onto the wax paper. Fortunately, at that time the cake was firm enough to hold the metal disc. And of course it stopped browning. phew...w..w..w.

Once done, be sure not to flip the pan right after or the topping will slide down. Let it set in the pan until warm to touch or until completely cool. The cake will shrink from the sides. I flipped it over when it was still warm. I was excited as I am always nervous when cooking with fresh fruits. What a pretty surface it had, I murmured to myself.

I leave the cake on the counter top for a few hours and it dries out a little. So, I put gelatin glace on it.

1 tsp of gelatin plus 30 g of cold water, let it blooms for 5-10 minutes.
30 g hot water, not boiling.

I let gelatin blooms in cold water then added hot water, stir well. Let it sit over the counter (room temp was around 15 C). When it started to form up as half jelly half liquid, with rubber brush, touch up nectarine surface. Let it cool in the fridge before slice.


The cake is best served the first 2 days it is made. Of course, with a scoop of vanilla ice-cream (imagine me running to the near-by Häagen-Dazs) The streusel filling was scrumptious. I will definitely make this again ! (soon!)

Tuesday, April 7, 2009

Toffee Nut Cake


This recipe uses emulsifier, SP (Ovalet is interchangeable). If you cannot find these in your location, butter cake should be fine too. I don't recommend low-fat content sponge, like genoise because it tends to dry out before topping is browned.

Most people love chewy/crispy nut topping, and so do I. The cake is coffee-intense. And yes, I am a coffee drinker. I prefer to use instant coffee powder rather than espresso shots as I think it gives outstanding aroma. My favorite brand is the green-label (decaf) Taster's Choice. The best I've discovered so far.

Here is cake recipe.

100 g of all-purpose flour
2 tsp of baking powder
1 tbsp of cocoa powder
4 eggs
1 tsp of S.P.
120 g melted butter
½ tsp of salt
1 1/2 tbps of instant coffee powder, with 1 tbsp of warm water

Preheat oven to 200 C. Grease and line 9-inch round pan or 9x7 inch square pan with wax paper. I use 9x9 square pan and folded up wax paper to get 9x7 mock-up tray.

Sift flour, baking powder and cocoa powder.

Beat eggs, sp, sugar and salt at high speed until fluffy about 5 minute. Reduce speed to medium and beat until pale and creamy. Gradually pour in flour in 3 portions, alternate by coffee solution, whisk well.

Tada , done with the sponge. Bake for 20-25 minute.

Note: Good thing about using SP is that it allows the batter to sit outside oven longer than genoise or chiffon cake. SP also helps cake to rise evenly and yields more delicate texture.

Topping:

100 g butter
100 g sugar
2 1/2 tbsp of all-purpose flour
45 g unsweetened evaporated milk (or whole milk)
125 g of cashew nuts
1/4 tsp of butter extract (optional)

(Next time, I will double up topping. )

Preheat oven to 220 C.

Put everything except nut and butter extract in double boiler until sugar dissolves. Off the heat, mix in butter extract, stir well. Mix in nuts. The mixture will be thick and pale in color. It will brown out in the oven.

Scoop mixture gently on to baked sponge cake. Return to the top rack of oven and baked for 12-15 minute. The recipe recommends putting heaps of soaked newspaper under the pan to prevent burnt bottom. I didn’t do that though. You will need to keep an eye on it as it tends to burn quickly. Ensure not to bake topping longer than 18 minutes as sponge tends to dry out after during second bake.

Let cool completely in the tray.


To cut - Flip the cake so that toffee nut topping faces down against chopping board. Use serrated knife slice through sponge, (leave out nut topping). Then use normal 8-inch knife cut through the toffee nut , just press it against chopping board.

Tuesday, March 17, 2009

Flourless Chocolate Cake


Call me a Timbuktu'er, I never had flourless chocolate cake. I have heard a hundred times that people went ohh-ahh over it. I read the recipe a while ago. The fact that eggs are main ingredient ....er...this doesn't impress me very much. I was visioning eggy taste with some kind of dry sponge, nothing fancy.


Until one day I met with a diner/food guru who writes food-related articles in a magazine. She said that she looooooove flourless chocolate cake. Okay , that's it. I will bake this myself. I 've got to trust her taste buds. Why not, she is a guru.
The recipe I tried was of Martha's web site. There are several great recipes available but I chose this one because less butter is required. Reason? I know you can guess. And of course, there are many others who prefer butter-rich recipes, but ....let me tried this one , the photo on Martha's looks really nice.


3 tablespoons unsalted butter or nondairy margarine, plus more for pan
6 ounces bittersweet chocolate, chopped
6 large eggs, separated, at room temperature
1 cup granulated sugar
3 tablespoons instant espresso powder
1/4 teaspoon coarse salt
1 tablespoon vanilla extract

Preheat oven to 350 degrees. Butter bottom of a 9-inch spring form pan, and line with parchment cut to fit. I also lined parchment paper on the side so that it's 2-inch higher from the pan as the batter tends to double in the oven (then deflates when cold). See below is my first batch, without extra parchment wall. The batter almost overflew.


Melt butter and chocolate in a heatproof bowl set over a pan of simmering water. Or, for me, I microwaved them in low heat, just half melted.

With a mixer fitted with the whisk attachment, beat egg yolks with 1/2 cup sugar until thick and pale and creamy. Add espresso and salt, and beat for 1 minute, just to combine. Add vanilla and chocolate mixture, and beat for 1 minute.

In a clean bowl , whisk egg whites until foamy. Slowly add remaining 1/2 cup sugar, beating until stiff peaks form. Fold whites into chocolate mixture in 3 additions. The first addition, I used whisk, to make chocolate mixture thinner. It's okay if the batter deflates a little, whisk in gently just until blend. Do not overwork, white streaks left in the bowl are so okay. Now switch to spatula, add the more whites, fold in gently but quickly, turn the bowl while folding.


Pour batter into prepared pan. Bake until set, 40 to 45 minutes. When it was baking half way through, I could see the batter almost double in volume and that my extra walls of parchment paper came in to play. 10 minutes later, my kitchen smelled like chocolaty heaven. Once done, the side will slightly shrink from edge. To check the doneness you can insert too pick and see if it comes out clean.

Let cool completely in pan on a rack. The cake will defalte in the center, that is how it is suppose to be. Remove parchment. Be gentle as the cake is fragile.

I skipped The Glaze as mentioned in Martha's website. But it would be nice for decorating. Here is glaze recipe.

Make the glaze: Place chocolate, butter, and vanilla in a bowl, set aside. Bring remaining ingredients [cream, sugar, espresso,salt] to a boil, stirring, remove from heat, and pour the boiled ingredients over chocolate mixture in the bowl. Whisk until smooth. Serve glaze warm with cake.


Verdict: Anyone see me tasting my first-bite would have called an ambulance. My pupil overwhelmingly dilated with surprise. The bite was tiny but the tasted was packed. It's chocolaty and very very and very light. I drifted away.

I baked this goodie on March 18th. It was not weekend but it indeed was a special occasion. It was my mom's birthday. Her favorite cake is always something associated with fruits i.e. fruitcake, orange-curd cake, blackforest (of course with cherry filling). She also like chocolate cakes especially the fluffy one. I am so sure she and her gangster would love this.

This is my mom, my sister, and me, 9-month old.

Some facts about my mom vs. her culinary world

- She collects baking wares. (repeat.... "collects").

- She bought a then-state-of-art oven in 1980s, but she never used it. I found this treasure "x" years later when I was 18, And that was my starting point of baking addiction. Note that it is not common in Asian household to have an oven. Free-standing style could be bought in store, with limited choices. Built-in oven was considered luxurious. So imagine 20 years ago (!) As if she knew, I would use it more frequent than my MP3. And I have to tell her, the oven is worth every penny she spent.

- Not long after I discovered the oven, I digged out for more, I found a hand mixer and some other rusty items, and a swirling copper whisk ! I tried to find a photo of that wierd-looking whisk which is non-existent nowadays.

One week later, I found a bag of expired pancake flour. OMG, since when did she became a amateur baker. As far as I recall, she was a busy entrepreneur who had two little monsters running around.

- Don't scream if I tell you I am still using "that" oven and "that" hand mixer I digged out from store room. And yes, everything you see on this blog was baked /made/whisked out of almost-20-year-old oven hand mixer. So far, they serve me very well. They are Moulinex's.

- I recalled that, the one and only cake my mom baked was made out of instant cake flour (I think when I was in pre-elementary school and my sister was a third grader?) It was dense and burnt. Well, the oven was good for reheating pizzas but not baking (which is why it burnt). My mom gave a piece to my sister to taste. My sister vanished quickly without a trace. I tasted and I told my mom that it tasted really nice and yummy. What happened next? my mom told me that I was lucky and that I could have to whole tray of (burnt) cake. I stood there trying to figure out what to do....I cried (come on, I was six!)

- She is really good at making ba-jang or Zong zi 粽子, steamed sticky rice wrapped in bamboo leaves with marinated pork and mushroom. I am certain she could made her fortune out of this if she turned this hobby into business.

- A few years ago, I told her I needed to lose weight. She prepared such healthy and unbelivably delicious breakfasts for me and my sister every day. I lost 4 pound in 2 months without being bitterly skipped meals.

- My mom complained whenever I baked at midnight. She feared of short-circuit as the oven was old. Ya, she has made her point. Unfortunately, I got inspired by nice-looking photos in my cooking book at 10 pm and...I do what I have to do....sorry.

- My old habit persists. Whenever I have free time on weekend, I digged out in store room with the hope to discover interesting (unused) baking equipment.

- I never could have found out what I love to do until that "oven-discovery" day. Thanks mom.

I wish I had a few candle on the cake. The piece below contains zero calories, if you consume it by eyes only.

Mmm..should I sing a birthday song a bit?

(me singing) Happy Birthday to you...Happy birthday to you....Happy birthday...happy birthday..y...y.

Happy birthday to Mami..i..i.

Friday, March 13, 2009

Cherry Cream Cheese Pie

When I was in college, I recalled my Sunday mornings started with a 4k jog. You know, every girls want to get tiny, including me. What I did after the regular jog was irregular. I drove to my favorite bakery house and had a piece of blueberry cream cheese pie. Oh no, don't judge me as yet, until you try this. Don't' ask me if I succeeded in getting slim. Well, I was not in a bad shape after all.
Prep time: 1hr and 2-3 hr to chill

Pie base
200 g graham cracker or cookie crumb
100 g butter, soften or melt it in to room temp liquid.

Filling
250 g cream cheese, room temperature (I use Philadelphia, don’t use low-fat)
200 g sweetened condensed milk
75 g lime juice

Topping- 1 can of cherry filling. (I used up 350 g for topping)

9-inch removable pie pan or disposable foil pan


Put crackers in electric mixer, pulse until become fine crumbs or until sandy, set aside in a medium bowl. Soften butter in microwave under medium heat. It is okay if it melts, but try not to over heat it. Pour butter on the cracker crumbs, mix with spatula or if you don’t mid getting your hand greasy, feel free to play with it. Mix these thoroughly, ensure no big chunk of butter left.

Now, grab about ¼ cup of the mixture, squeeze it lightly in your palm and see if it holds together nicely. If not, add 10 g-15 g of melted butter. The ratio of butter: cracker I have here yields pretty good base. But again, it depends on crackers available in your neighborhood, if they have low fat content, you may add more butter. However, I find out that more is better than less. Imagine when you cut the pie and that the base falls apart in crumbs, that wouldn’t look very nice huh?


Press crackers in removable pie pan. I prefer to press firmly against bottom and sides. In a 9 inch pan, pie crust will be 0.5 cm thick and the sides are 1 cm high. If you use 8-inch pan, you’ll have a little thicker crust. Wrap with plastic and rest in fried until firm, around 1-2 hours.

Filling – I use Philadelphia cream cheese. which comes in a 250 g bar. Once, I tried the low-fat version. It turned out cream cheese batter was too runny. And no matter how long I refrigerated it, it was not firmed and could not hold the topping. Meaning?….cherry sank to the bottom and create bruise -looking pie.....which suits for Halloween.


Before you beat cream cheese, ensure it is soft enough to twist. I usually bring it out directly from the fridge and warm in microwave under low heat for 1 minute. I mixed with hand mixer for about 10 minutes until fluffy. Add sweetened condensed milk. Beat until well blend. Scrape the side and bottom of the bowl. Continue beating until there are no lumps.


Gradually add lime juice. My advice for those who don’t like sour taste is to add half portion, beat until just well blend and taste. For me, I would go for the whole 75 g (4 limes). I love tanginess. It goes so well with mild sweet cherry topping. So I didn’t scale back the lime. Note also that the sourness varies with seasons and locations. I made this a few times and it is difficult to keep it tastes the same every time. For me, I just trust my tongue, mix-in ¾ lime juices, then taste, and gradually add juice depends on my mood at the moment.


Pour cream cheese batter in prepared pie crust, chill until firm, preferably 2-4 hr. It is important to let it completely set in fridge, otherwise it won’t be able to hold cherry topping.


A few hours later, lay cherry topping softly and evenly. Refrigerate until serve.

This goody can be made one day ahead.

Cut into 10 pieces : 330 calories per serving . Meaning, my 4 k run is pretty much to make room for a small piece of pie....which is .......WORTH IT!

Sunday, March 8, 2009

Strawberry roll with sweet coconut topping

The strawberry roll itself is really good. It is even better with the coconut crust. Ya, I've just made coconut cake a few days ago. I'd call it a coconut week.

Oh by the way, Last week was international women day. Salute to you all, ladies ! I know you are grabbing forks, but does anyone making tea? Come on dig in!


You know what, I never liked jam roll. It's not attractive. I have no idea since when I like it. But I've been making 4 pans of rolls within these two weeks. I think it is a real challenge whether or not I would roll it up nicely without breaking the sponge, let alone leave the brown skin in attached nicely on it. It really is.

Taste wise, the strawberry roll itself is good, not overly sweet given jam layer is extra thin. It comes to a surprise with brown coconut crust. Seriously, I haven't thought that a jam roll could be any fancier then putting butter cream on top .... but this brown coconut thing is interesting, don't you think?


Here goes the recipe

Sponge

150 g of cake flour ( I replaced 30 g with corn flour for milder texture)
6 egg yolks
80 g water
50 g sugar
2 tsp baking powder
100 g vegetable oil
1 tsp vanilla

6 egg white
50 g sugar
1/2 tsp cream of tartar ( I skipped this)

Filling - 1 cup of your favorite jam + 1 tbsp of lime juice.

Crust
100g butter, melted
60g sugar
2 eggs
120 g dried coconut flakes
30g milk
4 tsp baking powder
2 tsp vanilla

Preheat the oven to 200 C. Grease 9x12 inch roll pan

Sift flour and baking power, set aside.

In a big bowl, mix in yolks, oil,50 g of sugar, water,vanilla. Whisk until sugar crystals dissolve. Whisk in the flour lightly until well incorporated or until no lumps.


In another bowl, whisk egg whites, cream of tartar and 50 g of sugar until it forms soft but stable peak. Fold 1/3 of egg white mixture into flour+egg mixture, using whisk. This is to make flour mixture a bit runny so that it is easier to fold in the rest of the whites.

Fold in the rest of white, in 3 batches, using spatula. My technique is to cut in the middle and fold along side while the other hand is rotating the bowl. Do the cut-fold-turn quickly but gently. To check, drag spatula in the bottom of bowl if there are flour lumps. Again, do not overwork, as the cake relies on egg white bubbles to rise, folding too much will deflate them. Plus, overworking will agitate the gluten, the cake may turn a bit rubbery.

Once done, pour batter in prepared tray. Bake for 15 minutes or until toothpick inserted in the center comes out clean.

Remove from tray and cool down on rack. Do not leave this on hot tray as it continues to cook that way.

Flip and roll- cover cooling rack with plastic wrap. Now the flipping part, you have to be quick. One hand over the cake, flip, then lay the sponge cake on working table. Or you may cover the tray with plastic wrap, put the rack over the tray , then flip.

Now imagine you are about to roll up, arrange the long side (12 inch) facing you. Start rolling up by pulling plastic wrap and roll up firmly. You can see how to roll up the roll here. . What I did differently from the clip are that I rolled up from the long side while youtube clip started from the short side. And I used plastic wrap instead of tea towels.

Let it sit for a while about 1/2 hr, to let it curl up. Then, unroll it, spread jam thinly and evenly. Roll it back to shape firmly and wrap with plastic wrap. Set aside while preparing topping.

Preheat oven to 200 c.

For the Crust - mix everything in the bowl. Beat until well-incorporated.

Spread crust mixture over and on the sides. Return to the oven, place on the top rack, and bake until the crust turns brown.

Once done, it tends to loosen up a bit. Don't' worry, I just let it cool down until okay to touch. Then wrap it up firmly with plastic wrap to reshape it. I put in the fridge for a while until it cools down completely or until serve.

My kitchen smell nice for hours!

The roll is good for a few days in the fridge. Lovely is it?


Coconut Cake


I missed fresh coconut badly. If you happen to visit Thailand, do not hesitate to try one(s). I'm sure you'll get addicted to it, just like me.


Too bad I live in a city where coconut is considered an exotic fruit. All I have was dried young coconut meat I bought from Thailand. Nowadays I've seen quite a few bakery shops make this kind of cake, and of course they are so..o..o good. I tried to replicate one with vanilla sponge, filled with self-made coconut creme paste. Here is the recipe.


For the sponge
(A) Ingredients - The Dries

90 g cake flour
1/2 tsp baking powder
35 g sugar
1/4 salt

(B) Ingredients - The Yolks
4 egg yolks
32 g coconut milk ( I replace this with unsweetened condensed milk, or just milk)
25 g coconut juice ( I replace this with water)
32 g vegetable oil


(C) Ingredients - The Whites
4 egg whites
1/4 tsp creme of tartar
35 g sugar
Preheat the oven at 180 C. Prepare 9x12 jelly roll pan with wax paper, greased.


Sift together the dries (A). Set aside.

In another bowl, whisk together (B) ingredients, just to incorporate until sugar crystals disappear. Don't need to whisk until it gets fluffy though. Set aside.

Put (A)-the dry ingredients into (B) egg yolk mixture. Well, some prefer to do the other way around, by putting the wets to the dries as the flour won't dust up the counter top. For me I prefer to wet one bowl. Gradually whisk together make sure there is no lumps left.

In a big bowl, whisk 4 whites and creme of tartar together until it forms white foam. Gradually add sugar and beat until it forms soft peaks when you lift the whisk.

Fold in the whites mixture to the egg yolks mixture. But wait, the egg yolks mixture is thick and the whites mixture is thin. Folding these together all at once need more strokes thus deflate the batter. In order to get the same consistency, I scooped out 1/4 of whites in the the egg yolk mixture then use the whisk , stir lightly. Now the batter is a bit runny, fold in the whites ,in three batched. Use spatula to mix in each batch just to incorporate. Each time you add the whites, it is okay that the batter leaves whites streaks. Try to fold quickly but gently as possible. The final add should yield consistency batter with no lumps of flour or streaks of whites.


Pour in prepared pan, put in the lower rack for 15-20 minutes until a toothpick inserted in the middle of the pan comes out clean.


Let cool completely on the rack.

Coconut filling
125 g of coconut creme (I used milk)
125 g of evaporated unsweetened milk (I used milk)
150 g of young coconut juice (I used water+2 tablespoon of sugar)
40 g sugar
15 g corn flour
1/4 salt
1-1.5 cups of young coconut meat
30 g butter


Topping

1 cups of White chocolate bits , melted
2 tbsp of milk
2 cups of Coconut flakes


Put everything in the pot except coconut meat and butter. Stir well. Put on double-boiling and stir continuously. The golden rule of making this, as most of you are well-aware, is to pay full attention so as to not getting it hard-cooked. I don't have double boiling, so I put the pot on direct heat on a very low low heat (unless you have quick hands). Ya...keep stirring. And no....don't pick up any phone calls, you can do that later. Once it is thicken remove from heat for a while, stir for half minute. Put it back to heat, it will be creme-liked. I tasted creme at this stage, while continue stirring to check the doneness. If you taste the floury / starchy taste in your mouth, put it back to heat.

Once done, stir in butter until incorporates well. Then stir in the coconut meat.
To assemble the cake, cut the 9x12 inch cake in half so that you yield two 9x6 inch cake sheets. While the filling still warm, spread it on the cake evenly. Put the other half on top, press gently.


To make topping, microwave white chocolate bits and milk in medium heat until they melt. Stir until they are well blended and have nice spreading consistency. Brush it on the top of of cake. Immediately sprinkle coconut flakes on top and press gently.

Leave until completely cool before you make the first cut.


Notes on coconut - Coconut meat I used in this recipe is of the young ones. If you go the the supermarket and see brown/hard shell coconut without its fluffy-spongy white jacket, it is an aged coconut. Its meat is used to for coconut creme which is high on fat content. The juice of aged coconut is not editble/drinkable.


If coconut is not avalilable in your area. You can whip up whipping cream and fold in flaky coconut. This is good for filling and topping as well.