Showing posts with label cookies. Show all posts

Friday, September 25, 2009

Chocolate chip cookies


Oh my...my. It has been a big while since my last post. Not that I was travelling or busy with my work. I was busy baking, photographing and researching (of course, food-related). There are long long long list of items that I wanted to blog about. I wrote down on paper and post-its that I sticked around my kitchen walls. Okay, one by one. phew..w..w.


Chocolate chip cookies is a sinful snacks. Or you can consider it a meal if you have them from Levain. Here is my version with less fussiness. I just melt the butter in micorwave rather than cream it for 15 minutes as usual recipe calls for. I also opt to use bread flour, which tend to absorb more liquid than normal all-purpose flour. The reason i use bread flour is that , in shanghai, it is a lot easier to source bread flour (as you know, steamed buns are popular here.). Also, if you need the chewiness, bread flour would not hurt the texture. However, if you have all-purpose flour, you can simply use it , with same portion.


I like this recipe, especially with a touch of salt. It is just good that way. I normally reduce sugar to 90% (see recipe below). Storing: they are good 'outside' the fridge for a couple days. Best is to munch right away from the oven. So far I failed to keep them moist beyond day 3 even if I put them on Ziploc back. On day 4, they just turned into crisp and hard cookies no matter how they were stored, i.e. in Ziploc bag, in air-tight container, in the fridge or on kitchen counter. I found a tip on a web site that recommend putting a piece of fresh apple in the cookie jar. It claims this would help maintain the moist for a few days. But I wonder if those pieces of apple would turn rotten after 1 day (???). Would the cookies moist and molded? I don't know. If anyone try this, let me know.


This recipe makes 750 g of dough. So , if you make 30-g dough (for 3-inch diameter cookies), this batch yields 25 cookies.


No fuss Chewy Chocolate Chip Cookies -


2 C of bread flour (255 g or 9 oz) or alternatively, all purpose flour
1 tsp of baking soda
½ C of brown sugar
1 C of granulated sugar
1 tsp of table salt
1+1/2 sticks or ¾ C of butter (170 g or 6 oz)
1 egg + 1 egg yolk
2 tsp of vanilla extract
52% (dark) chocolate chuck, chopped.
Salt (sprinkle on unbaked cookies)

Sift dry ingredients together in a bowl, set aside. Make sure the brown does not clump up.

Micarowave butter in medium heat until completely melt (should not bubbling), mix in sugars. Stir with fork until they are completely incorporated and that you cannot see streaks of butter. Before mix in eggs, ensure butter mixture is not too hot. You can just simply poke a clean finger in the mixture and feel if it is too hot for your finger tip. If it is okay, pour in the eggs. Stir vigorously for half a minute until well-blended. Add vanilla extract, stir to combine


Add wet ingredients to the dries (or do it the other way around if you do not want to dirty too many bowl). Stir with fork until well blend. The good thing about making chewy cookies is that, it is a study animal, you don’t have to be kind. Just stir, smash, flip or do whatever to mix the dough.

Cover the cookie dough with plastic wrap. Push down the plastic so that it touches dough surface. And rest in the fridge until firm to make a ball, around 2 hours. For best color and taste, NYtimes recommend 24-36 hours rest in the fridges.
Talking aboug fridge, mine is not working well lately. I guess it is one of the very old models when anti-frost has not yet invented. So, whenever it was frosted, it stopped working. It just died. Then one day I found out my congee turned into “Gee” (as in "Gee! What is that smell!").

When you are ready to bake, pre-heat the oven to 325 F. If you want giant cookies, say 4-inch diameter, make 40-45 g of dough and then add dark chocolate chunks. I normally make 25-30 g dough, which yields 3-inch diameter, the right size to cure my crave.

Put the dough on the tray, lined with un-greased parchment paper, 2-inch apart. Flatten them down a bit. ***This is important*** Sprinkle salt very lightly on surface before you put the tray in the oven.


****this is also important (yes, notice 4 asterisks here!)**** bread flour differs in each location. Their ability to absorb liquid differs and this results in wet or dry dough that later reflect on the shape of cookies. The dough may not flatten at all. So, I suggest you try baking one cookies first and see if it flats out properly.If not, in the next batch, you can just flatten them down with your finger tips to the desired shape before baking.

Bake for 10-15 minutes for smaller cookies (25-30 g ball) , or 25 minute for giant cookies. Rotate the tray half way through to get them evenly browned.

They should be just a little dry out on the edge/surface but soft in the center. If you have thermometer, it should register 85C in the center. Do not over-bake or they will be just dry and hard. If the oven is too hot, the cookies will get burnt before they are done.


Remove from hot tray and cool on the rack.


Enjoy while they are warm. Got milk?


Friday, May 8, 2009

Butter cookies-sables à la poche-sand in your pocket

I always call them butter cookies. Apologies for the love of convenience. I recall a few years back I received a big bag of these for New Year gift. It was so rich and was really really and really hard-to-put-down. The whole family loved it and we finished a 2-pound bag in only a few days. I used to have the recipe with egg yolks but again…. I lost it. The problem back then when making this cookies was that the dough tended to melt very fast while piping. The hot/humid weather in Bangkok was to blame. I found a recipe using egg white and strong bread flour that caught my interest. I doubted how bread flour would help with piping. Here is what Apple Pie Patis Pate quoted in this web site “…..The sandy texture reminiscent of shortbread is achieved through the use of small amounts of liquid and sugar to minimize gluten development. The spread is also limited through the use of strong bread flour, allowing the piped cookies to hold the star tip pattern during baking….”. Genius huh !!! The recipe below is from Apple Pie Patis Pate who adapted it from Michel Suas’ Advanced Bread and Pastry. What I did differently was adding a few drops of vanilla extract and decorated with chopped dried cranberries. For the wet ingredients:

12 ounces / 340 grams butter, at room temperature
4 + 1/2 ounces / 128 grams powdered sugar
1 +3/4 ounces / 50 grams egg whites
a few drops of vanilla extract
For the dry ingredients:
1 teaspoon ground cinnamon (I omitted this)
13+ 3/8 ounces / 380 grams bread flour
2/3 teaspoon baking powder
1 teaspoon salt
For decoration
Dry cranberries , chopped
Sift the dry ingredients together and set aside. Cream the butter until pale and cramy then mix in the powdered sugar. Add the egg whites and vanilla extract slowly and mix until thoroughly incorporated.
Add the sifted dry ingredients to the wet ingredients. Mix just until thoroughly incorporated, take care not to over-mix. Use a pastry bag with a large star tip, pipe into 1 1/2 inch wide mounds.
I decorated each cookies with dried cranberries.
  
Bake the piped cookies at 325ºF for 15 minutes, or until lightly golden and well-browned on the edges.

Sunday, February 8, 2009

Chocolate Pistachio Shortbread


Another can't-put-down goodie from Cook Illustrated. Raise your hands if you are addicted to afternoon biscuits.

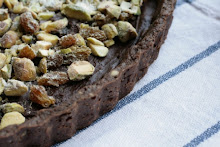
The Chocolate Shortbread is bitter and cookie-liked. I baked blind until the dough was firm to touch. Then, let cool for a while, poured melted semi-sweet chocolate and topped with chopped pitachios and raisins.

This one is good in bite-size as well. Next time I'll cut it when warm as it broke up in pieces when I cut them when completely set.


For final touch, splash with white chocolate or caramel trails which also helps keep nuts and raisins in place. Well, for me, maybe not, I like it bitter this way.


I have just now realized, while I'm posting this in internet cafe (as I'm away from home), I'm missing my buddy, a small / huggable oven in my shanghai apartment. Poor me, I miss baking, kneading dough. I wonder , what I am becoming ?

Thursday, December 18, 2008

Chez Panisse Almond Tart


I need to confess. I misspelled Chez Panisse, for a few times before I got it right.

David described the famous tart in his website. While reading, my mind was wandering, sitting at the patio, fork-digging the tart...then the fork bent (as David mentioned, this pie was removed from the menu as customers complained they had trouble eating it with fork), I then use my hand grabbed it up...put it my mouth...chew...w...w. Okay, wake up to reality. I was inspired, it was time to strap on the apron.


I agree with David, this one is a bit tricky (and sticky). I would really really and really love to make it again, but...(yes, there is a but) I will need to stand in front of the oven at all times. You'll see why.
Find the recipe here

The crust was easy to make. The dough I made was not as soft as David's. I prefer to make it dryer as easier to handle that way.

Once finished rubbing butter into flour, I added water by spraying water into the flour(instead of pour 1tbsp directly into the bowl as I found it is almost impossible to get all bits well-combined with 1 pour of tiny amount of water). While spraying, toss the bowl to dampen dry crumbs.


Talking about spraying, I counted how many times I sprayed into the bowl, how many strokes would turn crumbs into dough. It counted 75. -_- I intended to measure ….75 puffs was equal to how many tablespoon or water(?) . I know, I got my agenda. The day passed by, I forgot to do this. Then My sub-consciousness reminded me, in my dream that I needed to do this first thing in the morning. So next morning, I did. [Are you envisioning me, getting up in the morning, running in PJ , crazily puffing water into a tiny tablespoon? My neighbor might have seen me , which explains why they looked at me in a odd way.

[now go back to procedures.]

I stopped spraying when the crumbs held together when I squeezed them in my palm. I think I used more than 1 tbps of water as directed. I was surprised though that unbaked dough came out drier than expected. May be the humidity was low? See below, humidity in my kitchen was only 30'ish (in summer it was 70'ish, and FYI, in Bangkok it was 80'ish in a non-rainy day).


I poured the dough on the working space, as the rule of thumps in making pie, I didn't knead. I wrapped the dough and it went directly outside the window. No, I dint’ throw away, I just rest the dough in a cold place. Outside was colder than the fridge. I set alarm clock not to forget it there, an hour later, before I went shopping.

Can I confess one more thing? I used bread flour instead of all-purpose flour. I have a (lame) excuse; bread flour is a lot easier to buy (here in shanghai) and a lot cheaper. I did try to source cake flour produced locally. No luck. Bread flour should be okay, I thought. I barely kneaded it, plus there was very little liquid in the dough, I was just crossing my fingers that gluten wouldn’t develop. And I’m glad it came out okay.


After I came back from shopping (gee, it was cold out there. I couldn't feel if my ears were still attached to my face. Especially, after an old guy pointed at me...gossipped with his grandson at the mall, maybe my ears fell off the ground !?). I checked myself in mirror and I looked fine (and pretty). So, I strapped on an apron and started to roll the dough.


The dough was easy to handle. I pressed the dough up to fully cover the side. Once done, I chilled the pan for half an hour. Put it out, slid inside the oven and baked blind. After 15 min, the side of the dough shrank quite a bit !!! I kind of expected this but...oh gee, please don't shink further. I wanted to decored it up to the edge, made it nice...but boyd, the oven was hot! So, I just hoped that it left some edge for me enough to hold the filling.

While baking pie shell, I made filling, which is super easy. But hold on, once you pour the filling and start baking....someone got to do the dirty job.


In the oven, once the filling started to bubbled...I smoothed it out to prevent ugly top as described in David's website. It was not easy but it is a must. And when you open oven door frequently, temperature was , I think, a bit difficult to control.


And this was when I think how baking new recipe is interesting. There are a few factors out of control. Sometimes I just scream when things went wrong in the midst.


And , I found it very difficult to make top crust as nice the original. Eventhough this was a pain, I made this twice with in twon weeks. It was a big hit , maybe my (male) colleagues love something crunchy ? I myself like it very mooch (much) too. I will definitely make this again.


Thanks again David.

Note: David Lebovitz is my latest culinary hero, besides Alton Brown. :-D

Tuesday, December 16, 2008

Gingersnaps

Gingersnaps had me at hello. If I recall it right, I was on US domestic flight and they served crisp, flat, cookies. I didn’t even know what it was called back then until I flipped though the empty package....gingersnap(???). Apologies for my ignorance, I was not quite an epicure.

Recently, I bought ginger cookies from IKEA store, not bad at all. I understand that they are imported from Sweden as with the rest of the goodies on the shelf. My visits to IKEA lately didn't always end up buying housing stuff, but always carried back a few packs of cookies.

So far, I haven’t had bad gingersnap (and I wouldn’t wish to). I wonder if I could make one of my own. Since Christmas is around the corner, I have good excuse to strap on my apron.


Got Hardware? Ginger-man cookie cutter, checked. Rolling pin, checked. Hand mixer, checked. Got Software? Ground ginger, checked, Ground cinnamon, checked. Nutmeg, unchecked (uhh !).
See recipe from David's Website (Chez Panisse Gingersnap) here


I sprinkled cinnamon sugar on unbaked cookies. I have no quota on spices so…put them on!

The good thing about ginger cookies is that you can fearlessly play with it. It won’t go bad-shaped. One thing need to be care full is the room temperature that may soften the dough and that cutting and re-rolling becomes a messy task.

Verdict: I smiled when I had a bite. The sweetness is just right. If you roll thinly, it melts in your mouth. I will double ginger and cinnamon power next time. This is just the matter of personal preference. You may stick to recipe and adjust spiciness later on.
Comments from a freind of mine, Kate - "could you please next time don't make cookies resembles human shape ? I feel like a monster biting out those gingerman's litlle arms and legs."
Me - "okay, I'll make them round-shaped next time"
Kate - (silence, grabbed the last gingerman from zipbag) Ngawm..m..ngawm..m (chewing).
Me - 8-^

Friday, July 25, 2008

Cocoa Fudge Cookies and Banana Oatmeal Cookies


Here are two no-fuss cookies from Nicole Weston's Baking bites I love how these are so easy to make... especially when I don't need to bother hand mixer to cream butter + sugar. Everything goes in the bowl, mix , scoop and then poof..f...f here come my babies.

My first baby, Cocoa Fudge Cookies, original recipe is from Cooking light magazine but my inspiration was from a handsome photo displayed on Nicole's website. Here is the recipe. Cocoa Fudge Cookies Recipe


I couldn't find dried tart cherry so I put in white chocolate bits from my last cookie batch. The dough, as seen above, came out just fine, not too gooey and was easy to shape. This recipe turns out to be a coffee mate, these two things compliment each other so well. If anyone has a coffee house, you can serve this cookie with espresso. I believe people would crave both (coffee + cookie) even more. However ,this maybe a little too sweet for those who are chocolate hard core'r like me. Next time I would use tard dried cherry as stated in recipe to cut sweetness.

The second no-fuss cookies, Banana Oatmeal Cookies. Oh I need to say, I don't know why lately I crave bananas. Am I transforming into a monkey or I'm becoming one , or I've become one??? Never before, that I like this fruit. Never mind, I bake this out of my love of cookies and bananas. :-> Again, inspiration is from Nicole's baking bites. Thanks Nicole for the recipe.

Here is recipe Banana Oatmeal Cookies


I baked these two black/white cookies, gave away to friends, spared half a dozen for myself in a ziplock bag. I was surprised how quick I could finish them in one day even though I thought they would last longer on the kitchen shelf. Obviously, I am a good planner but a bad implementor. Oh...my chewy babies don't you hide in that little zipbag!!! .

Saturday, July 12, 2008

Outrageous chocolate cookies


This was my second effort after the first failure last month. What happened last time? It was a shame that I altered ingredients, as I was short of "real" chocolate and replaced with cocoa powder then added some butter intuitively. Result? weird pieces of hard cooked/bland biscuit. Lesson learned? YES. Don't be frugal on ingredients or alter the recipes unless you are experimenting a new one.

Okay then I promised I would decipline to what said in the recipe, and yes with all my respect (and from the failure last time) I measured up as accurate as I could. Sometimes you just trust your eyes and ears thinking that you've been baking for awhile and that measuring seems to be less necessary. Believe me, baking is art and science , the latter of which implies that you must follow instructions as much as possible.

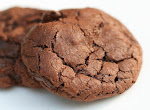
I put loads of chocolate in. I love this recipe. It's easy, no fuss. While baking, my kitchen smelled like the house of chocolate. I love the look of cookies, cracky and crisp. They actually are very soft. The chocolate chucks are half melted inside, make you crave for a cup of coffee.

The orignal recipe is from Martha Stewart's website

http://www.marthastewart.com/recipe/deliciously-outrageous-chocolate-cookies?autonomy_kw=chocolate%20cookies&rsc=header_2

Makes 2 dozen

8 ounces semisweet chocolate, roughly chopped
4 tablespoons unsalted butter
2/3 cup all-purpose flour, spooned and leveled
1/2 teaspoon baking powder
1/2 teaspoon salt
2 large eggs
3/4 cup packed light-brown sugar
1 teaspoon vanilla extract
1 package (12 ounces) semisweet chocolate chunks

Directions

Preheat oven to 350 degrees. Heat chopped chocolate and butter in a microwave-safe bowl in 20-second increments, stirring in between, until almost melted; do not overheat. In another bowl, whisk together flour, baking powder, and salt.
In a mixing bowl, beat eggs, brown sugar, and vanilla on high speed until light and fluffy. Reduce speed to low; beat in melted chocolate. Mix in flour mixture until just combined. Stir in chocolate chunks.
Drop heaping tablespoons of dough 2 to 3 inches apart onto baking sheets. Bake, rotating sheets halfway through, until cookies are shiny and crackly yet soft in centers, 12 to 15 minutes. Cool on sheets 10 minutes; with a thin metal spatula, transfer to racks to cool completely.

I love the photo from this site. They close up the inner texture.
http://www.bakeorbreak.com/2008/02/14/outrageous-chocolate-cookies/

Friday, June 6, 2008

David lebovitz's Cookies

The cookies speak for themselves. Yummmmm.

Here is David's recipe.
http://www.davidlebovitz.com/archives/2006/11/nick_malgieris.html

Thursday, May 1, 2008

Mochi (modified)


This is a modified Japanese Mochi. The ingredients is nowhere near the original. I guess small bite-size that resembles mochi that make people call it this way.

You can consider this as a healthy snack, I do. I love to have a few bites and drain down with a cup of tea. If you want to make this, get prepare well ahead of time to soak the beans overnight though.

Here is recipe.

Mix together these dry ingredients
All purpose flour 250 g
Baking powder 3 g
Baking soda 2 g

Mix together these wet ingredients
Egg yolks 1
Melted butter 40 g
Water 100 g
Sweetened condensed milk 125 g


Mix the wets to the dries to form dough. It should be soft but not gooey. The texture should be similar to that of clay. Add little flour if needed. Rest for 15 minuntes.

Black-bean filling
Black beans 250 g (soaked over night)
Sugar 150 g
Melted butter 40 g
Baking soda ½ tsp
Vegetable oil 2 tbsp
A pinch of salt

Bring black beans and baking soda to a boil for 20 minutes. We will put these in the mixer and dry it out again in the pan. So you have to drain out excess water. I cannot tell exactly how much liquid each machine needs in order to mix it finely. Different makes handles dryness differently though. I drained out too much water and that my cheap mixer got stuck so I poured little water back in.

In the mixer/blender , add sugar, butter and oil. Mix until form fine paste. Return ingredient to the pan under low heat. Dry it out a bit. You can test it by scoop out a portion and spat down back to the pan. If it disappears of blend with the rest of the paste….dry it out a bit more. Remember don’t over dry coz when it’s completely cooled down, it forms harder, more manageable texture. Oh you know what, you can taste the paste if it’s just as sweet as you like. I stick with the recipe as I don’t like it too sweet. Once finished, let it cool down.

Now the fun part begins. Cut the dough in to a golf ball size. Use the thumbs and yr finger tips to spread it out in circular motion. Ensure the trim is thinner than center coz you will finally put the trim together to form the ball. Add fillings, ah-ah, not too much, I know you love fillings, everybody does !. But believe me you don’t want to end up in a mess where black bean paste splats around your hands. Try your best to wrap it up. You may use water to ensure the dough is firmly sealed.

Bake 170 C for 10-15 minutes until golden brown.