Sunday, March 1, 2009

Sesame Walnut Bread

I am huge fan of nuts and I am a chewing-monster. I have been planning this for a big while but never had a chance. Making bread is somehow time-consuming (3-hr prep time). I am agree .... but the result worths it.


Walnuts go so well with bread. No reason, they just good with bread texture. Imagine if I put almonds (?) ehhh...na ! peanuts...ehh...ne! My favorite walnut bread is store-bought which is very very and very buttery. Since I intend to make a loaf of hearty bread, I put just enough butter as you can see in the ingredients below
Dough
500 g of wheat flour
140 g of cold water
5 g of instant active yeast
3 g of bread improver ( you can skip this)
1 egg
80 g of brown sugar.
1/2 cup of ground black sesame
1/2 cup of lightly roasted walnut (broken into pieces by hand)
a pinch of salt
Filling - Mix everything together to form paste and set aside.
3 tablespoon of melted butter
1 cup of ground black sesame.
1/2 cup of lightly roasted walnut (broken into piece by hand)
1/2 - 1 cup brown sugar - depend on your preference
Put together dry ingredients in the bowl, except salt and ground black sesame and walnuts, stir briefly. Add salt, this is to ensure yeast and salt are not put next to each other. Stir in 135-140 g cold water and 1 egg. Knead roughly until the dough comes together in one lump, 2-3 minutes. Don’t worry if the dough seems dry and tough. It will be pliable once add butter. Add soften butter. Continue kneading until the dough is flexible enough to stretch into window pane. I used small hand mixer with dough hooks, it took me around 20 minutes. Once I kneaded with hands, it took pretty much the same time, but my shoulders were worn out. That was a great work out but I would prefer that off-the kitchen.


Sprinkle ground sesame on the dough and knead by hand until well blended. The dough now turns to grayish/ spotted dough. Be careful though, the more you add dry ingredients like ground sesame, the dryer the dough becomes. So, be sure to stop if the dough is not workable with your hands or it will become a brick. My experiment, next time, I will make it a pitch dark bun, I wonder how far I can go.

Form a ball and put the dough in a well-greased bowl, wrap with plastic. Let it rise in a warm place for 30 min. My kitchen was 12 C , way to cold for the yeast to leaven. So I warmed up the oven to 160 c for 3 min then turned off , splash some water to make fog. I doubt if one-day my mini-oven would go short-circuit as water leaks into the place where it is not supposed to be!. Anyway, I get used to stick my hand in the middle of oven, to feel it's not too hot. This is just to mimic a cozy home for my lovely dough. Kids...don't follow my instruction on this and you should not do this at home. This applies strictly on my oven , it is difficult to advise how long you should turn you oven on though. If you have thermometer, the ideal temperature for the unbaked bread to rise is around 80F or 27 C , preheat the oven accordingly.

I put the bowl in the middle rack. Be sure to put some cloth under the bowl as it tends to be overheated by direct contact to the hot iron grid that supports the bowl.

Before I go further, you can follow instruction from baking911 on how to let the dough rise in the warm oven. Be careful, I have made many disasters before. Okay, I see your curious eyes...what I did was turning on the oven a few minutes, splash water in. The oven was then foggy and temperature in the oven was rising...great! I put the dough inside. Then someone called, I thought it was a just 4 minutes, I came back, and dough surface was cooked. I was C-R-U-S-H-E-D. I wish I had an undo button, but too bad this was at no point of return. What did I do? First, screamed. Second, put myself together and third,.....everything went to the trash. And believe it or not, I did that twice ! Raise your hand if youhave made the same silly mistake. (dang it! no one?)

Once the dough has rest for 30 min, it should be 1.5 or 2 times of original size. Lightly sprinkle flour on table. Deflate the dough. Knead the dough briefly. Why? As we rest the dough, yeast is digesting sugar. Kneading the dough will re-distribute yeast's food evenly after the its big meal. Remember we have another rest , once we shape up the dough.

Break or chop 1/2 cup of walnuts, knead into the dough briefly. Roll out dough to a rectangle shape, 1/2 inch thick. Rotate the dough every other few strokes. This helps the dough rise evenly in the oven and also helps ensure it is not stick to table. Sprinkle some flour under the dough as you go.


Spread the filling , leave out 1/2 inch edges on all four sides so that you can seal. Roll up as tight as possible , push it forward with the lower part of you palm. Imagine now you are making strawberry roll. Seal up the edge to nicely.

If the rolled dough is kinked, you can straight it up. For final touch, cover it up with rolled oats or other grains of your choice such as sesame. Just lightly brush the dough with water, roll it over the oats.


Let the dough rise in warm place, cover with greased plastic wrap or damp cloth for 1 hour. The dough will double in size or maybe 2.5 times if your kitchen is hot and damp.

Put on the lower rack, 180 C for 20-25 minutes. If you have needle thermometer, you can check the doneness if the center of the bread reaches 88-99 C (or 190-210 F).

Let cool on the rack. Sesame smells so nice. It really is nice. I mean it. Ah ah! don't cut it while hot, it will ruin the textture and I call it disaster number two.

I myself like it a lot. My colleages love it....and no I didn't pay them to say so.....no no...never.!

Sunday, February 8, 2009

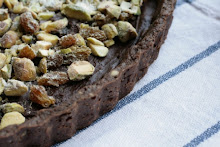
Chocolate Pistachio Shortbread


Another can't-put-down goodie from Cook Illustrated. Raise your hands if you are addicted to afternoon biscuits.

The Chocolate Shortbread is bitter and cookie-liked. I baked blind until the dough was firm to touch. Then, let cool for a while, poured melted semi-sweet chocolate and topped with chopped pitachios and raisins.

This one is good in bite-size as well. Next time I'll cut it when warm as it broke up in pieces when I cut them when completely set.


For final touch, splash with white chocolate or caramel trails which also helps keep nuts and raisins in place. Well, for me, maybe not, I like it bitter this way.


I have just now realized, while I'm posting this in internet cafe (as I'm away from home), I'm missing my buddy, a small / huggable oven in my shanghai apartment. Poor me, I miss baking, kneading dough. I wonder , what I am becoming ?

Sunday, January 11, 2009

Almond Roca Ring


For the past few months that I have been searching for glossy chocolate frosting around food blogs, I finally found it in my drawer, from my 1980s cook book.
I made this last week. It was a the first in my wish-to-bake list. There are actually a few goodies that I baked during Christmas left unblogged. I will try my best to get them up here.
Almond Roca Cake( From the Joy of Chocolate 1982)
6 eggs plus 2 yolks
1/4 C granulated sugar
1/2 C brown sugar
1/2 C ground toasted almond
1/4 tsp of almond extract
1 tsp finely grated lemon zest
1 C sifted all purpose flour
1/2 tsp salt
3 tbsp unsalted butter , melted and lightly brown
Preheat oven to 350 degrees. Butter and flour a 9-inch tube or bundt pan
Beat eggs , yolks and sugar over simmering water until the mixture becomes warm and sugar crystals dissolve. Then off the heat, beat until egg mixture form heavy ribbon trail.
I got nervous every time I made sponge cake. For me, it is one of the most easy-to-go wrong cake. Seemed like, if I happened to pick up a 1-minute phone call while folding the batter, I would make myself belive the cake would be dense and ugly, and I would be screaming to whom ever called me at that moment "I'm making my baby, I'll call back asap"......ohhh, am I being exaggerate. Well, I belive it just a matter of repetition, and pratricing. Maybe I need to bake it frequently to get some confidence. Okay, where are we ?
Gently add almonds , vanilla and almond extracted and zest, beat briefly. By hand, fold in the flour and salt in 3 portions with whisk (or you may do so with spatula, if you like, but every time I used spatula I ended up with lumps of flour). Work rapidly and gently so as not to deflate the egg volume. Then incorporate the melted butter. My trick is to beat melted butter with about 1 cup of fluffy egg mixture in a separate bowl (I used fork, don't worry that you deflate this 1 cup of mixture , you have the whole bowl to lift the cake) ... then pour it back to the batch and fold gently with spatula (now I switch to spatula). By doing this, melted butter tend not to sink to the bottom.
Pour batter in prepared bundt pan. Bake for 35 minute or until cake shrinks slightly from the side. Let cool for 10 minutes. Then unmold cake on the rack. Let cool completely before you apply chocolate frosting.
The recipe calls for syrup (which I skipped). The ingredients are simply 1/3 cups of sugar and 1/2 cups of water. Bring to a simmer for 3-5 minutes. Remove from heat and cool briefly. Stir in amaretto or liqueur of your choice.
If you choose to make syrup, cut the cake by half, drizzle hot syrup over the cut side. Let cool, then spread on chocolate glaze. Here is the recipe for chocolate glaze.
4 oz. semi sweet chocolate glaze
1/2 C granulated sugar
1/4 C light corn syrup
1/4 C hot water
5 tbsp unsalted butter
1 tsp vanilla extract
4-5 tbsp confectioners' sugar
Put everything except butter and confectioners' sugar in the saucepan. Cook over medium low heat. Stir constantly. I have to confess....I was screaming when I saw lumps in my sauce pan. I doubted if I did not stir constantly. After trying fix it by stiring heavily, I ended up having bubbles in the glaze and all the lumps were still there. Well, it was okay to have some bits to chew after all...er..r that was a silly way to comfort meself (yes "mee-self" as in Jamaican accent) when thing goes wrong.
Let the mixture cook at low heat for 3 minutes. Off the heat. With spoon (as mentioned earlier, do not use whisk as it traps bubbles in the glaze) stir in butter 1 table spoon at a time then add vanilla and confectioners sugar. Stir until glaze cool slightly and is a nice spreading consistency.
I used spatula to pour glaze on the cake. Remember to let the cake cool completely otherwise the glaze will be runny. I also put some toasted nuts and crushed caramel candies around the edge to
dress up a bit

Thursday, December 18, 2008

Chez Panisse Almond Tart


I need to confess. I misspelled Chez Panisse, for a few times before I got it right.

David described the famous tart in his website. While reading, my mind was wandering, sitting at the patio, fork-digging the tart...then the fork bent (as David mentioned, this pie was removed from the menu as customers complained they had trouble eating it with fork), I then use my hand grabbed it up...put it my mouth...chew...w...w. Okay, wake up to reality. I was inspired, it was time to strap on the apron.


I agree with David, this one is a bit tricky (and sticky). I would really really and really love to make it again, but...(yes, there is a but) I will need to stand in front of the oven at all times. You'll see why.
Find the recipe here

The crust was easy to make. The dough I made was not as soft as David's. I prefer to make it dryer as easier to handle that way.

Once finished rubbing butter into flour, I added water by spraying water into the flour(instead of pour 1tbsp directly into the bowl as I found it is almost impossible to get all bits well-combined with 1 pour of tiny amount of water). While spraying, toss the bowl to dampen dry crumbs.


Talking about spraying, I counted how many times I sprayed into the bowl, how many strokes would turn crumbs into dough. It counted 75. -_- I intended to measure ….75 puffs was equal to how many tablespoon or water(?) . I know, I got my agenda. The day passed by, I forgot to do this. Then My sub-consciousness reminded me, in my dream that I needed to do this first thing in the morning. So next morning, I did. [Are you envisioning me, getting up in the morning, running in PJ , crazily puffing water into a tiny tablespoon? My neighbor might have seen me , which explains why they looked at me in a odd way.

[now go back to procedures.]

I stopped spraying when the crumbs held together when I squeezed them in my palm. I think I used more than 1 tbps of water as directed. I was surprised though that unbaked dough came out drier than expected. May be the humidity was low? See below, humidity in my kitchen was only 30'ish (in summer it was 70'ish, and FYI, in Bangkok it was 80'ish in a non-rainy day).


I poured the dough on the working space, as the rule of thumps in making pie, I didn't knead. I wrapped the dough and it went directly outside the window. No, I dint’ throw away, I just rest the dough in a cold place. Outside was colder than the fridge. I set alarm clock not to forget it there, an hour later, before I went shopping.

Can I confess one more thing? I used bread flour instead of all-purpose flour. I have a (lame) excuse; bread flour is a lot easier to buy (here in shanghai) and a lot cheaper. I did try to source cake flour produced locally. No luck. Bread flour should be okay, I thought. I barely kneaded it, plus there was very little liquid in the dough, I was just crossing my fingers that gluten wouldn’t develop. And I’m glad it came out okay.


After I came back from shopping (gee, it was cold out there. I couldn't feel if my ears were still attached to my face. Especially, after an old guy pointed at me...gossipped with his grandson at the mall, maybe my ears fell off the ground !?). I checked myself in mirror and I looked fine (and pretty). So, I strapped on an apron and started to roll the dough.


The dough was easy to handle. I pressed the dough up to fully cover the side. Once done, I chilled the pan for half an hour. Put it out, slid inside the oven and baked blind. After 15 min, the side of the dough shrank quite a bit !!! I kind of expected this but...oh gee, please don't shink further. I wanted to decored it up to the edge, made it nice...but boyd, the oven was hot! So, I just hoped that it left some edge for me enough to hold the filling.

While baking pie shell, I made filling, which is super easy. But hold on, once you pour the filling and start baking....someone got to do the dirty job.


In the oven, once the filling started to bubbled...I smoothed it out to prevent ugly top as described in David's website. It was not easy but it is a must. And when you open oven door frequently, temperature was , I think, a bit difficult to control.


And this was when I think how baking new recipe is interesting. There are a few factors out of control. Sometimes I just scream when things went wrong in the midst.


And , I found it very difficult to make top crust as nice the original. Eventhough this was a pain, I made this twice with in twon weeks. It was a big hit , maybe my (male) colleagues love something crunchy ? I myself like it very mooch (much) too. I will definitely make this again.


Thanks again David.

Note: David Lebovitz is my latest culinary hero, besides Alton Brown. :-D

Tuesday, December 16, 2008

Gingersnaps

Gingersnaps had me at hello. If I recall it right, I was on US domestic flight and they served crisp, flat, cookies. I didn’t even know what it was called back then until I flipped though the empty package....gingersnap(???). Apologies for my ignorance, I was not quite an epicure.

Recently, I bought ginger cookies from IKEA store, not bad at all. I understand that they are imported from Sweden as with the rest of the goodies on the shelf. My visits to IKEA lately didn't always end up buying housing stuff, but always carried back a few packs of cookies.

So far, I haven’t had bad gingersnap (and I wouldn’t wish to). I wonder if I could make one of my own. Since Christmas is around the corner, I have good excuse to strap on my apron.


Got Hardware? Ginger-man cookie cutter, checked. Rolling pin, checked. Hand mixer, checked. Got Software? Ground ginger, checked, Ground cinnamon, checked. Nutmeg, unchecked (uhh !).
See recipe from David's Website (Chez Panisse Gingersnap) here


I sprinkled cinnamon sugar on unbaked cookies. I have no quota on spices so…put them on!

The good thing about ginger cookies is that you can fearlessly play with it. It won’t go bad-shaped. One thing need to be care full is the room temperature that may soften the dough and that cutting and re-rolling becomes a messy task.

Verdict: I smiled when I had a bite. The sweetness is just right. If you roll thinly, it melts in your mouth. I will double ginger and cinnamon power next time. This is just the matter of personal preference. You may stick to recipe and adjust spiciness later on.
Comments from a freind of mine, Kate - "could you please next time don't make cookies resembles human shape ? I feel like a monster biting out those gingerman's litlle arms and legs."
Me - "okay, I'll make them round-shaped next time"
Kate - (silence, grabbed the last gingerman from zipbag) Ngawm..m..ngawm..m (chewing).
Me - 8-^